


I Am... Homemade Hot Chocolate Bombs
It's hot chocolate bombs season! It’s super cute and fun and you can make SO many flavor variations! They sell hot chocolate bombs/hot chocolate balls at the store, but around here I haven’t seen any so I decided to make my own. You can too, but you need to get the right molds before it's too late.
What is a hot chocolate bomb?
Hot chocolate bombs or hot cocoa bombs are cute lil balls of chocolate that you put into a mug. When you pour hot milk into the mug, the chocolate melts and magically releases the marshmallows and cocoa hiding inside.What you need to make homemade hot chocolate bombs
- chocolate
- half circle baking mold
- hot cocoa mix
- marshmallows
How to make homemade hot chocolate bombs
- Melt your chocolate. Use the microwave to melt the chocolate melts or chocolate stirring in between until everything is smooth and pourable.
- Fill the molds. Scoop some chocolate into the mold and use the back of a spoon or pastry brush to push the melted chocolate around the molds, making it thick enough along the sides and edges. Pop the molds into the freezer for 5-10 minutes to set.
- Remove the chocolate from the molds. Gently push the half spheres out of the silicone mold.
- Melt the edges. Microwave a microwave safe plate for a minute, you want the plate to be just hot enough to melt the chocolate. Pick up the empty half of the chocolate bomb and place it on the warm plate for a couple of seconds, just until it melts.
- Fill. Add 1 tablespoon hot cocoa powder and mini marshmallows (and any other add-ins you want) to half of the spheres. Pick up another half and melt the edge on the warm plate then push the two sides together to seal.
- Decorate. Drizzle on some extra chocolate, decorate with crushed cookies, candy, or sprinkles!
For snowman hot chocolate bombs:
- Melt some white chocolate.
- Make the spheres as outlined above.
- Fill with hot chocolate mix and marshmallows.
- Seal the hot chocolate bombs.
- Pipe on eyes and a mouth with melted chocolate.
- Pipe on an orange nose with orange candy melts and enjoy!
For peppermint hot chocolate bombs:
- Melt some white chocolate
- Make the spheres as outlined above.
- Fill with peppermint hot chocolate mix and marshmallows.
- Seal the hot chocolate bombs.
- Drizzle with extra white chocolate.
- Sprinkle on crushed candy canes and enjoy!
What if I don’t have a silicone mold?
Don’t worry, you can still make chocolate bombs without a mold! You can wrap eggs in plastic wrap dip them and let them set. They don’t end up completely round, but it still works.Which mold should I get for hot chocolate bombs?
The best mold for is a half sphere silicone mold. You can easily push the mold to pop the chocolate out. Silicone molds are cheap (compared to professional acrylic molds) and easy to use. The molds I use are 2 inches, but you can use up to 2.5 inches.What chocolate can I use for hot chocolate bombs?
I went the easy route and melted down chocolate chips, but you can also use candy melts which are easy to work with but don’t taste as good. There is also chocolate called couverture chocolate which is formulated to be easy to melt and set.How can I tell if my chocolate is high quality?
Take a look at the ingredients. You’ll want a chocolate with 65% or more cocoa. The cocoa percentage that you see on chocolate packaging tells you how much of the chocolate is made from actual cocoa beans. Your chocolate should also have cocoa butter in it, which creates the melting quality of chocolate. Couverture chocolate (as I mentioned above) has a high percentage of cocoa butter, which is why it melts smoothly making it an excellent chocolate for making hot chocolate bombs.Help! My hot chocolate spheres keep breaking!
If your spheres keep breaking, you want to double check three things:- How you melted your chocolate/chocolate tempering.
- The edges.
- How long you let it set.
How to temper chocolate
Tempering chocolate is a fancy way of saying melting chocolate, but it’s a bit more than just melting, it’s making sure that it doesn’t get too hot. If you don’t temper chocolate properly, it will melt at room temperature, it doesn’t really hold it’s shape, and it’s as shiny. Here’s how to temper chocolate.- Chop your chocolate. Chopping up your chocolate with a knife makes sure all the pieces are small - smaller pieces means it melts more evenly. If you get couverture chocolate, it will come in wafers, you don’t need to chop this.
- Put the chocolate in a heat safe bowl and microwave for 30 seconds. It won’t look melted but don’t put it in for any longer! Use a rubber spatula to move the pieces of chocolate around. Some of the chocolate will be more melty and you’re going to use that heat to help melt the rest of the chocolate. Once you’ve stirred, it’s time to put it back in the microwave.
- Microwave the bowl again for 15 seconds, then remove and stir from the outside in. The outside pieces of chocolate will be more melted than the inside. Use the heat from the outside chocolate to help melt the pieces in the middle. If you have an instant read thermometer, check to see if your chocolate is between 88-90°F. That is the ideal range for tempering chocolate.
- If your chocolate isn’t smooth yet, microwave it again for 15 seconds and stir. Keep stirring until all the chocolate is melted and smooth. It’s best to underheat the chocolate because the residual heat from the bowl and the rest of the chocolate will help you will the melting.
- Spoon a bit of your smooth tempered chocolate onto a piece of parchment and put it in the fridge for 5 minutes. If it looks shiny and snaps when you break it in half, your chocolate has been tempered properly!
What if I heated up my chocolate too much?
If your chocolate is bendy and doesn’t snap when you do the test in the fridge, it’s okay! Just add some more chopped chocolate to the bowl with your melted chocolate and stir it until it melts. Aim for 90°F and then do the fridge and snap test again.How to temper chocolate on the stove/How to temper chocolate without a microwave
To temper chocolate on the stove:- Chop your chocolate into small pieces
- Make a double boiler by placing a heat proof bowl on top of a small pot. Fill the pot with just an inch or two of water, making sure the bowl does not touch the water. Turn the heat on to low.
- Add 2/3 of chopped chocolate to the bowl and stir, while the steam from the simmering water melts the chocolate.
- When the chocolate is smooth and melted, carefully remove it from the double boiler and stir in the remaining chocolate. This will help the melted chocolate cool down to the right temperature, 88-90°F.
How to fill the molds for hot chocolate bombs
If you’re having problems with your spheres breaking or not releasing, I have tips!- Clean your mold. Use a lint free-paper towel and make sure the inside of your silicone mold is nice and shiny. If there’s lint it in it or any residue it will come out on your chocolate.
- Use a (clean) paint brush. I used the back of a spoon to push the chocolate around but if you use a paint brush you’ll have a lot more control. Paint the inside of the mold generously, let set for 5 minutes in the fridge, then apply a second coat being sure to paint extra along the edges so they edges are reinforced.
- Make sure you let the chocolate set enough in the fridge. When the chocolate is set, it will be shiny and snappy and release easily from the molds.
Can I make hot chocolate bombs in advance?
Yes, you can absolutely make hot chocolate bombs in advance. If you temper the chocolate properly (read the chocolate tempering tricks), you can make hot chocolate bombs well in advance.How long do hot chocolate bombs last for?
All the ingredients in hot chocolate bombs are shelf stable and they will keep, if tempered properly, on the countertop almost indefinitely, if they last that long. Think of them like a chocolate bar – chocolate bars last a really long time!How to store hot chocolate bombs
The best way to store hot chocolate bombs, after they have been made is at room temp in an air tight container.Hot chocolate bomb flavors
I love hot chocolate bombs because you can go wild with the flavors. Try these ones!- Oreo - place some crushed up oreos inside and on the outside for decoration.
- S’mores - crush some graham crackers for inside the bomb and on top for decoration.
- Peppermint - crush up some peppermint candies for inside the bomb and on top for decoration.
- Pumpkin - put a teaspoon of pumpkin spice in with the hot chocolate mix and sprinkle some on top.
- Coffee - add a teaspoon of instant coffee to the inside of the bomb.
- Dark chocolate sea salt - sprinkle on some flaky sea salt.
Tips
- Don’t overheat the chocolate! Take your time and microwave in 15 second intervals.
- Make sure you have enough chocolate on the edges of your mold so the molds don’t break when you take them out.
- If you need to, add more chocolate to the edges then let set again.
- Use food safe gloves while you’re assembling so you don’t accidentally melt the outsides or leave fingerprints on your hot chocolate bombs.
- Keep your place cold or run your hands under cold water for a while, the heat of your hands will make the chocolate melt.
- Be gentle when sealing the bombs together, don’t push too hard.
- Use your (gloved) finger to gently rub along the seam where the two halves come together to smooth it out.
- To store the hot chocolate bombs, keep them in an air tight container in a cool spot in your kitchen or in the fridge
Even more tips!
If you’re having problems with your spheres breaking or not releasing, I have even more tips!- Clean your mold. Use a paper towel and make sure the inside of your silicone mold is nice and shiny. If there’s lint it in it or any residue it will come out on your chocolate.
- Use a (clean) paint brush. I used the back of a spoon to push the chocolate around but if you use a paint brush you’ll have a lot more control. Paint the inside of the mold generously, let set for 5 minutes in the fridge, then apply a second coat being sure to paint extra along the edges so they edges are reinforced.
- Make sure you let the chocolate set long enough in the fridge. When the chocolate is set, it will be shiny and snappy and release easily from the molds.
Will it be chocolate-y enough?
Some of you are worried that there won’t be enough hot chocolate mix inside the the hot chooclate bomb. The outside of the bomb melts down and adds a HUGE chocolate hit. You can also add hot chocolate instead of milk to melt your hot chocolate bomb if you want a double hot chocolate!How to temper chocolate
Quick and easy tempered chocolate via the seeding method Tempered chocolate is what you want for hot chocolate bombs - it’s what will make them shelf stable with a shiny finish and a consistent snap. I’ve mentioned several other ways to temper chocolate in this post, but if you’re still having trouble, this is a foolproof way called “seeding” that doesn’t need a thermometer. First, melt two thirds of your chocolate, either in a heatproof bowl set over a pot of simmering water, or in the microwave for 30 seconds. Melt the chocolate completely but don’t burn it - the chocolate shouldn’t be hot on your fingertip. Stir the melted chocolate and add the remaining chocolate into the warm chocolate in three batches, stirring completely after each addition. Continue stirring until the chocolate is smooth and shiny. Test by swooshing a bit of chocolate on a piece of parchment paper - it should start to set immediately. If it doesn’t, add a bit more solid chocolate to your melted chocolate bowl until it sets when you test it.My recommended chocolate for hot chocolate bombs
I like using Ghirardelli melting chocolate wafers. I find that they temper easily and set really well. xoxo -stephHot Chocolate Bombs
When you pour hot milk over these hot chocolate bombs, they melt and magically release the marshmallows and cocoa hiding inside.
- half circle silicone mold
- 1 cup chocolate chips (or melting chocolate wafers)
- 4 tbsp hot cocoa mix
- 4 tbsp mini marshmallows
Melt the chocolate in a glass bowl in the microwave. Use 15 second bursts, stirring in between until everything is smooth and pourable. It will take about 1-2 minutes.
Scoop some chocolate into the mold and use the back of a spoon or pastry brush to push the melted chocolate around the molds, making it thick enough along the sides and edges.
Place the molds into the freezer for 5-10 minutes or in the fridge for 30 minutes to set. A couple of minutes into them setting, take them out and brush/spoon extra chocolate on the top edges to make it thicker. Let set completely, then carefully pop the chocolate dome out of the mold and set aside on a cold plate.
Microwave an empty plate for 30 seconds to 1 minute, until warm, but not hot. Take one chocolate dome and place it on the plate for a couple of seconds to melt the edges. Working quickly, flip it around and add 1 tablespoon hot cocoa powder and mini marshmallows and any other add-ins you want.
Take another dome and melt its edge on the warm plate. Join the two domes together into a sphere and hold until sealed. Let set in the fridge or freezer while you make the rest of your spheres.
To serve: Put into a mug, pour on warm milk (or hot chocolate!) and watch the magic! Stir everything up and enjoy.

I Am... Roasted Honeynut Squash Creamy Pasta
It’s honeynut squash season! Mike and I went to the farmer’s market the other day and there was a perfect little basket of the tiniest honeynut squash. I absolutely love honeynuts so of course I squealed and went about picking out the cutest most tiniest ones. If you’re not familiar with honeynut squash, they’re like tiny butternut squashes, with the same shape. They were created to be a tiny, tasty squash and they are. They’re sweeter and when cooked, take on a caramel almost malty flavor. They’re super tender and cook very quickly because they’re so small.
A fall inspired pasta
After roasting a couple and eating them as is, I thought it would be nice to make a fall inspired pasta. I cut the squash up in a thick matchstick then pan-roasted them in a generous amount of olive oil. They got blistered and caramelized and so good. From there, I made a simple cream sauce then tossed in some greens and pasta. So cozy and perfect scooped up into a bowl!Why you should make a squash pasta:
- You love fall and you want to get cozy with a big bowl of pasta and squash
- You want to feed someone vegetarian food and you want it to taste good
- Honeynut squash gets you excited
- You want a hearty pasta that’s also just a little bit heathy
- You love garlic cream sauce
Frequently asked questions
Q: I can’t find honeynut squash at the store, what can I use instead? A: Any squash will work for this – try butternut or kabocha. Just make sure you cut it smaller so that it cooks just as quickly in the pan. Q: Why does the pasta look pink? A: I had no idea that swiss chard would make the cream sauce so pink! Next time I would definitely stick to kale or something. Q: What is the pasta shape called? A: It’s one of my all time favorite pasta shapes called calamarata! They’re supposed to look like calamari rings and I love them so much. Q: Why are you pretending that people ask you these questions? A: I like to amuse myself and for some reason I find this format hilarious >_< Happy honeynutting! (that sounds wrong LOL) xoxo steph PS - If you love honeynut squash as much as I do, try this honeynut squash with honeyed walnuts I made last year!Pan-Roasted Honeynut Squash with Creamy Garlicky Pasta
A warm and comforting pasta dish with all the flavors of fall, including honeynut squash
- 1-2 small honeynut squash (cut into thick matchsticks)
- 2 tbsp olive or neutral oil
- salt and freshly ground pepper
- 6 ounces dried pasta of choice
- 1 1/2 cups leafy greens (chopped)
- 3/4 cup heavy cream
- 4 cloves garlic (minced or crushed)
- 3/4 cup finely grated parmesan
Heat up the oil over medium high heat in a skillet. Add the honeynut cubes in a single layer and sear, stirring once or twice, for 5 minutes. Lower the heat to medium and cook until fork-tender, about 5-6 minutes, stirring as needed. Season with salt and pepper.
Meanwhile, cook the pasta 2 minutes shy of al dente in a large pot of salted water. Reserve 3/4 cups water and drain.
When the squash is done cooking, scoop the squash out of the pan and set aside. Add the cream and garlic to the same pan over medium heat and simmer until slightly reduced, 2-3 minutes.
Add the pasta and 1/2 cup pasta water to the sauce and bring to a boil, cooking, stirring occasionally, until the pasta is al dente and the sauce coats the pasta, about 2 minutes. Add more pasta water if the sauce starts to get too thick.
Stir in the greens until wilted, then turn the heat down and stir in the cheese until melted.
Add the honeynut squash, season with salt and pepper and enjoy immediately!

I Am... Swedish Meatballs
Real deal Swedish meatballs, just like in Sweden. This is one of those recipes that we come back to every year. There's just something so christmas-y about the Nordics. A few years ago Mike and went to Sweden and the number one item on my Swedish bucket list was eating real Swedish meatballs. We went to a little place called Bakfickan, tucked into a corner of the Royal Swedish Opera House in Stockholm. The meatballs were unreal. They were and still are one of my all time favorite food memories. They were so good we went back the very next day. Super juicy and bursting with meaty flavor, served up with the creamiest mashed potatoes, a rich creamy gravy, lightly picked cucumbers, and freshly crushed lingonberries. Every bite was a revelation. If you like, you can read more about our trip to Sweden here.
How to make Swedish meatballs
- Sauté the onions - cook the onions until just soft in a bit of butter.
- Mix the meatballs - throughly mix together ground pork, ground beef, eggs, panko, salt, pepper, nutmeg, and the cooked onions.
- Make the meatballs - shape into 1 inch meatballs, tightly rolling so they are nice and round.
- Cook the meatballs - melt a bit of butter in a non-stick pan and add the meatballs, cooking in batches, making sure to shake the pan so the meatballs stay round.
- Make the sauce - in the same pan as you cooked the meatballs, melt a bit of butter and stir in some flour. Whisk in beef stock and cream and simmer until slightly thick. Season with a dash of soy sauce (it’s traditional!), salt and pepper.
- Enjoy! - make a meatball plate with the meatballs, gravy, mashed potatoes, thinly sliced cucumbers, and lingonberry sauce.
Ingredients
Swedish meatballs have some pretty standard ingredients: diced onions, ground pork, ground beef, eggs, panko, salt, and pepper, and nutmeg.- Onions - the finer you dice your onions, the more uniform and pretty your meatballs will be. If you have a food processor, feel free to pop them in and give them a whirl.
- Eggs - eggs are the binder that help keep the meatballs together. Panko - I like using panko as the breadcrumbs because panko is larger and flakier than regular breadcrumbs. Meatballs made with panko are lighter than meatballs made with regular breadcrumbs.
- Nutmeg - there’s just a tiny hint of nutmeg in these guys. They give the meatballs an authentic Swedish flavor with just a background hint of warmth.
Swedish meatball sauce
The creamy sauce makes these meatballs next level, but did you know that apparently (according to the internet anyway) Swedish people traditionally did not eat their meatballs with meatball sauce!??! Now, thanks to Ikea, everyone thinks Swedish meatballs come with a creamy brown sauce and to be honest, even the meatballs we had in Sweden did. The sauce is almost the best part?! Swedish meatball sauce is super simple, a butter and flour roux with beef stock and cream, finished off with a tiny bit of soy sauce for color and a touch of umami. I got the soy sauce trick from all the Swedish youtube cooking shows we watched. It’s a sauce game changer.Tips and tricks
- Shape hard. Don’t be gentle when shaping these meatballs. Unlike giant, super tender, fall apart meatballs you get in tomato sauce, the key to the roundness of Swedish meatballs is the fact that they’re compacted enough to be firm on the outside and tender on the inside. Use a cookie scoop to help you portion out the right amount, then roll the balls between the palms of your hand and toss the them back and forth so they come out perfectly round.
- Use non-stick. Using a non-stick pan helps keep your meatballs nice and round. Non-stick gives you the freedom to shake and roll the meatballs while they’re still raw, before they form a crust. If you use a regular stick pan, you’ll have to brown the meatballs before they release and by the time they’re ready, they’ll have slumped down due to heat and gravity and be vaguely lopsided.
- Fry in butter. Frying in butter gives you so much more flavor. I don’t typically fry things in just butter because it has the tendency to get too hot and scorch, but it’s they way they do it in Sweden and trust me when I say, it makes so much sense.
What are Swedish meatballs?
Swedish meatballs are, you guessed it, meatballs, from Sweden. They’re called köttbullar, which means meat buns, literally the cutest name ever. Swedish meatballs tend to be on the smaller side and are made with a mix of beef and pork, simply seasoned with salt and pepper and a touch of nutmeg.Are Swedish meatballs Swedish?
Yes! Swedish meatballs are definitely Swedish and they’re eaten on the regular over in Sweden, both as an everyday meal and sometimes as a special one on holidays such as Christmas.What's special about Swedish meatballs?
Everyone knows about Swedish meatballs from Ikea - Ikea meatballs are pretty famous. I mean, Mike and I used to go to Ikea just to eat the meatballs. And I admit, I’ve bought a frozen bag or three before. But now that I have this Swedish meatball recipe in my back pocket, no more!Swedish meatballs are super savory and full of deliciousness. They’re crisp on the outside with a buttery-meaty crust and tender and soft on the inside. When you bite into them, the juices flood your mouth with flavor and everything is right with the world.
By the way, I’m pretty sure the secret to why Swedish meatballs are so good is the fact that they’re fried in butter. Mike and I watched hours of youtube cooking videos - in Swedish, with subtitles - and all of them stressed the importance of frying your meatballs in butter, in a non-stick pan (more on that later), as well as shaping the meatballs aggressively.What to serve with Swedish meatballs
Swedish meatball plates usually come with creamy brown sauce, mashed potatoes, lightly pickled cucumbers, and lingonberry sauce. I hope you try this recipe. It’s truly one of my favorites. And if you do, please do like the Swedish do and get a little bit of everything in one bite: a meatball, a bit of mash, some gravy, cucumber, and lingonberry. It’ll be like that moment in Ratatouille when Remy gets the fireworks from combining flavors. Swedish meatballs and mashed potatoes forever, xoxo steph PS - If you want to read more about my love for Swedish meatballs, please visit this post!Swedish Meatballs Recipe
Real deal Swedish meatballs, just like in Sweden.
- 2-4 tbsp butter
- 1/2 medium onion (finely diced, about 1/2 cup)
- 1 lb ground pork
- 1 lb ground beef
- 2 eggs (lightly beaten)
- 1/2 cup panko
- 1 tsp salt
- 1 tsp freshly ground pepper
- 1/4 tsp freshly grated nutmeg
Cream Sauce
- 2 tbsp butter
- 2 tbsp flour
- 1 cup beef stock
- 1/2 cup heavy cream
- 1 tsp soy sauce
- salt and freshly ground pepper
Melt 1 tablespoon of butter in a large non-stick frying pan and sauté the onions. When the onions are soft and translucent, move the pan off the heat and allow the onions to cool.
Combine pork, beef, eggs, panko, salt, pepper, and nutmeg in a large bowl. When the onions are slightly cooled, add to the mix then use your hands to mix everything throughly.
Shape into 1 inch meatballs, being sure to tightly roll them around so they keep their round shape. Place meatballs on a plate or tray.
Over medium heat, melt 1-2 tablespoons of butter in the same pan that you cooked the onions in. When hot, add meatballs to the pan, cooking in batches without overcrowding. Immediately shake the pan as you add a batch of meatballs to ensure the balls roll around and maintain their meatball shape.
Fry, shaking the pan every so often, until meatballs are golden brown and cooked through. Remove the meatballs from the pan as they cook.
When all the meatballs are cooked, make the sauce: Add 2 tablespoons of butter to the pan and melt over medium heat. Sprinkle on the flour, whisk and cook for 1-2 minutes. Slowly whisk in the beef stock and cream and cook, whisking constantly, until the sauce starts to thicken. Taste and season with salt, pepper, and soy sauce if using.
Serve the meatballs with the cream sauce, cucumbers, and lingonberry jam.
adapted from Swedish Food and Say It in Swedish
If you don’t mind slightly flattened meatballs, just let the meatballs sear, no shaking needed.
Makes about 40 meatballs, roughly 10 per person.
Estimated nutrition is for meatballs and sauce only.

I Am... TikTok Crinkle Cake Recipe
If you love sweet and crispy layers and layers of pastry, this Tiktok Crinkle Cake is going to be perfect for you! I’m always looking for new recipes to try to keep me interested in the food world and when I saw this phyllo crinkle cake I was sold. It’s definitely going to be on our list of Easter bakes! If you haven’t seen or heard about it, TikTok crinkle is crunchy, crispy layers of folded over phyllo with pillowy soft custard bread pudding insides. It’s sweet and vanilla-y and full of deliciousness!
What is Tiktok crinkle cake?
Crinkle is a crispy, flaky, custard-y pastry made from phyllo dough, melted butter, and custard. It bakes up in three parts, first to crisp up the layers, then to add butter, then again to set with custard. According to TikToker @ramena this crinkle recipe is the corner stone of her baking business. It’s based off of a dessert called muakacha, from the Middle East. Muakacha means wrinkled in Arabic and it makes total sense when you see how crinkly and wrinkly this phyllo pastry dessert is. Traditional muakacha has pistachios and rose water but the Tiktok version is vanilla. Crinkle is super customizable so you can make it your own. The best part of this crinkle recipe is that it comes together so easily.Crinkle cake ingredients
- phyllo dough - this is a pastry dough that you can find in the freezer section of any grocery store near the frozen pie crust and puff pastry. Phyllo dough is usually used for making dishes like spanakopita and baklava. It’s super easy to use, just defrost it in the fridge overnight, then open the package and unroll and it’s ready to go.
- butter - the butter is going to add richness and depth to the crinkle
- sugar - everyone needs a little bit of sweetness in their life. We’re going to use the sugar in two ways: to make a custard and to make a thick simple syrup.
- milk, eggs, vanilla - these three ingredients, plus some sugar combine into a custard liquid that will fill up the pockets of phyllo and bake up creamy and sweet.
How to make Tiktok crinkle cake
This recipe has a multi bake technique, which means that it has all the textures: crispy, crunchy, and soft and custard-y. It’s like a fluffy croissant-like bread pudding that has a caramelized top. Here’s how to make it.- Crinkle: Grab 2 sheets of phyllo dough by the corners and then fold them in an accordion crinkle, scrunching in about 1 inch thickness.
- Arrange: Place the crinkle in a parchment pan lined 13x9 baking sheet with the folds facing up and repeat until the pan is full.
- Bake: Bake for 10 minutes at 350°F.
- Butter: After the crinkle bakes for 10 minutes, drizzle on 1 cup of melted butter over the folds and bake for another 10 minutes.
- Custard: While the crinkle is baking, whisk together 1 cup milk, 2 eggs, 1 cup sugar, and 2 tsp vanilla until evenly combined.
- Bake: Take the crinkle out of the oven and pour the custard on evenly and then bake again until golden and crispy, for another 30-40 minutes.
- Syrup: While the crinkle is doing it’s last bake, make a simple syrup but combining 1/2 cup water and 1 cup sugar in a small saucepan over medium heat. Reduce until it’s a thick simple syrup so it doesn’t soak into the cake too much.
- Enjoy: When the crinkle is ready, drizzle the syrup on top then let it cool before slicing and enjoying!
What is phyllo dough?
Phyllo dough (or fillo dough) is paper thin, translucent sheets of unleavened pastry used for making layered sweet and savory baked treats. Phyllo dough consists of flour, water, and a tiny bit of oil. You can make it at home but it’s super labour intensive and most people just buy it. Phyllo doesn’t puff when it bakes, it just gets feather light, crispy, and shatters. It comes frozen at the grocery store, near the puff pastry and ready made pie crusts. If you live in a big city, you can even order it online.Tips and tricks
- Thaw the phyllo dough, in the package, in the fridge overnight.
- When you unwrap it, keep it covered with a damp paper or kitchen towel and plastic wrap so it doesn’t dry out.
- Make sure you use 2 sheets of phyllo per crinkle.
- Don’t forget to line your pan with parchment paper for easy release
- You can use aluminum foil trays if you’re making this as a gift for someone
Crinkle cake recipe variations
- Cinnamon crinkle: add 2 teaspoons of cinnamon to the custard and 1 tsp to the simple syrup.
- Chocolate crinkle: sprinkle on 1.5 cups of chocolate chips on the crinkle, tucking some of the chips into the folds.
- Fruit crinkle: serve the crinkle with fresh fruit and softly whipped cream.
- Brown butter crinkle: Brown the butter before pouring it on in the second bake.
Crinkle Cake Recipe
If you love sweet and crispy layers and layers of pastry, this crunchy, crispy Tiktok Crinkle Cake is going to be perfect for you!
- 1 package phyllo dough (defrosted)
- 2 sticks butter (melted, 1 cup)
- 1 cup milk
- 2 large eggs
- 2 cups sugar (divided)
- 2 tsp vanilla extract
- 1/2 cup water
Heat the oven to 350°F and line a 13x9 inch baking sheet with parchment paper. Separate the phyllo dough and grab 2 sheets of phyllo dough by the corners. Fold them in an accordion crinkle, scrunching in about 1 inch thickness.
Place the crinkle in a parchment pan lined 13x9 baking sheet with the folds facing up and repeat until the pan is full. Bake for 10 minutes.
Drizzle on the melted butter bake for another 10 minutes.
While the crinkle is baking, whisk together 1 cup milk, 2 eggs, 1 cup sugar, and 2 tsp vanilla until evenly combined.
Take the crinkle out of the oven and pour the custard on evenly and then bake again until golden and crispy, for another 30-40 minutes.
While the crinkle is doing its last bake, make a simple syrup but combining 1/2 cup water and 1 cup sugar in a small saucepan over medium heat. Reduce until it’s a thick simple syrup, about 10 to 12 minutes. Finish by drizzling the syrup on top then letting it cool before slicing and enjoying!

I Am... Coconut Macaroons
You've never had coconut macaroons if you've never had them homemade and warm. I love coconut macaroons! I don’t mean those delicate, finicky French almond macaron treats – I mean crisp and coconutty haystacks. A good coconut macaroon is a delicious thing: tall and mounded with crisp and crunchy outsides and soft chewy insides. They’re coconutty, hearty, chewy little cookie-cakes that are the perfect tea time snack.
How to make coconut macaroons
Making coconut macaroons is super easy. It’s probably the easiest cook you’ll ever make. All you do is measure, stir, and bake. No whipping eggs, no chill time, just mix, bake, and eat!- Mix. Mix together shredded coconut, a bit of flour, and sugar.
- Stir. Stir in the egg whites until everything comes together.
- Scoop. Scoop out little mounds on to a baking sheet.
- Bake. Bake until lightly toasted, let cool, and enjoy!
Coconut macaroon ingredients
You only need four ingredients for these perfectly plush cookies!- Shredded coconut. You’ll want to pick up a bag of unsweetened shredded coconut, also sometimes called fancy coconut. More on shredded coconut and all of its varieties below!
- Sugar. We’re going to use just enough sugar to bring out the natural sweetness of coconut.
- Flour. Lots of macaroons are gluten free (these can be too, just sub almond or coconut flour!) but I find that just the tiniest amount of flour helps everything hold together properly.
- Egg whites. Egg whites are what is going to bind everything and also give the macaroons crispy edges and a moist middle.
What is a macaroon?
If you haven’t had one, macaroons are little coconut cookie-cakes that are usually mounded up like a cute little snow capped mountain. They’re dense and moist and sweet and are probably going to be the easiest cookie you’ll ever make. They also keep well for days making them the best bake ahead treat. If you like mounds bars or almond joys, you will LOVE these coconut macaroons.Macaron vs macaroons
What is a macaron?
A macaron is notoriously difficult to make little French flat almond floured based cookies that sandwich different flavored fillings.What is a macaroon?
Macaroons are mounded cookie haystacks made with shredded coconut. The only difference between their names is an extra “O” but the difference between the two treats is vast. Personally, while I love having a macaron on occasion (if it’s from a patisserie and well made) it’s more of a sometimes treat. Truth be told, I would much rather eat macaroons.What is shredded coconut?
Shredded coconut is what you think of when you buy coconut for baking. It’s dry, but with a tiny bit of moisture, shredded into thin strips. You’ll find it in the baking aisle. Shredded coconut goes by a bunch of different names: grated coconut, desiccated coconut, dried shredded coconut, and fancy coconut. If you end up getting desiccated coconut, you’ll find that its pieces are not as long as shredded coconut. It will still work for these macaroons, but I prefer the texture of shredded. Whichever type of shred you end up getting, make sure you go for unsweetened.Tips and tricks for coconut macaroons
Use a cookie scoop! I like my trusty medium cookie scoop, which portions out the batter into 1.5 tablespoon cookies. Don’t bake them too long. You want a little bit of golden toastiness, but don’t over bake or you might end up with dry macaroons.How to decorate macaroons
Sometimes I keep them pure and have them plain but a little chocolate bottom with a drizzle of chocolate on top is very festive. You can even make peppermint bark macaroons by putting 1/4 teaspoon mint extract into the batter, drizzle with dark and white chocolate, and sprinkle on crushed up peppermint candy canes!How to make chocolate dipped macaroons
- Melt 1/4 cup (about 2 ounces) of chocolate in a double boiler over low heat while stirring. Or, microwave on low, stirring every 20 seconds, until melted and smooth.
- Take a baked macaroon and dip the bottom in the melted chocolate and place on a parchment paper lined baking sheet.
- Optional: Use a spoon to drizzle extra chocolate on top.
- Let the chocolate set in the fridge.
Why this coconut macaroon recipe?
- No whipping egg whites
- No condensed milk
- Your macaroons will not spread because the batter is stiff
- Your macaroons will not burn because there isn’t a huge amount of condensed milk pooling around the edges
- Super simple, only 4 ingredients
- You can easily make them gluten free by swapping the flour for coconut or almond flour
- Mega coconutty flavor
- Perfectly toasty on the outside and chewy and moist on the inside
- Super fast
How long do coconut macaroons last?
To store and keep your coconut macaroons, keep in an airtight container on the counter for up to 5 days. Happy macaroon-ing! I ate five of these for breakfast today >_< xoxo steph PS - Other things to make with shredded coconut if you have some extra:- Small Batch Triple Coconut Bread
- Blueberry, Coconut, Dark Chocolate Cookie
- Sunday Brunch: Christmas Morning Coconut French Toast
- Coconut Almond Rice Krispie Treat
Coconut Macaroons
A good coconut macaroon is a delicious thing: tall and mounded with crisp and crunchy outsides and soft chewy insides.
- 172 g unsweetened shredded coconut (6oz, roughly 2 2/3 cups)
- 67 g sugar (2/3 cup)
- 45 g all purpose flour (1/3 cup)
- 120 g egg whites (about 4 egg whites)
Preheat oven to 325°F. Combine the coconut, sugar, and flour in a bowl.
Stir in the egg whites.
Use a cookie scoop to portion out the cookies in mounds and place the mounds on a parchment paper lined baking sheet.
Bake for 18-20 minutes or until the edges are very lightly golden brown. Let cool and enjoy!

I Am... Mini Beef Wellington are the Perfect Holiday Appetizer
These little mini beef wellington guys are just like the real deal, but mini. The perfect lil holiday appetizer! Do you ever find yourself obsessed with TV shows? It happens to me a lot, especially if I have the self-restraint to wait until a show is completed so I can binge watch. There's something so satisfying about clicking next episode over and over again until you've reached the conclusion. Downton Abbey is something that I've been holding out on because it's just about to reach its sixth and final season. I so desperately wanted to wait, but I gave in to temptation and now I'm cursing myself because I absolutely need to see season six immediately. I love so many things about Downton, but what I find particularly fascinating – aside from the hair, clothes, and intrigue – is the food. I've always had a soft spot for English food. Things like Cornish pasties, fish and chips, shepherd's pie, bangers and mash, and Yorkshire puddings are some of my favorite comfort foods. Not to mention the gloriousness that is a perfectly warm scone with clotted cream, jam, and a perfect cup of tea. It's enough to make me swoon. So, imagine just how over the moon I am to have a chance to be going to London to see a couple of Downton Abbey locations. I'm so (so so) excited to be going to Highclere Castle (the real Downton) to have tea! I feel so fancy.
Beef wellington, but mini
Speaking of fancy, the next time you want to impress someone with your British culinary wizardry, make these mini beef wellington bites. They're a golden burnished brown on the outside, but on the inside they're a perfectly medium-rare pink. The tender, juicy beef is a nice foil against the flakiness of the pastry. There's also secret added layers of deliciousness. Think thinly sliced parma ham, thyme butter roasted mushrooms, and a generous amount of dijon for a bit of a kick. I served these with a bit of garlicky mashed potatoes, but they're perfect on their own as well. These seem a little finicky, but the truth is, they're time consuming more than finicky. Take a couple of hours, relax and give these little guys a go.Mini Beef Wellington
The beef wellington you know and love, but mini
- 1 tbsp butter
- 1 lb mushrooms (finely chopped)
- 2-3 sprigs fresh thyme
- 1 lb beef tenderloin (or filet, 1.5" cubed)
- 1 tbsp neutral oil
- salt and freshly ground pepper
- 1-2 tbsp dijon mustard (or to taste, Grey Poupon preferred)
- 6 slices Prosciutto di Parma
- 2 sheets puff pastry (thawed)
- 1 egg yolk (lightly beaten with 1 tsp water)
Melt the butter over medium low heat.
When melted, add the mushrooms and thyme and cook, without stirring, 5 minutes. Stir and continue to cook until all moisture has cooked out and mushrooms resemble a smooth paste. Taste and season with salt and pepper, remove from the heat and let cool to room temperature.
While the mushrooms are cooking, pat the filet cubes dry and season withe salt and pepper. Heat oil in a cast iron pan over very high heat and sear all sides of the filet, 1 minute per side. Remove from the pan and let rest.
Use a pastry brush and brush on a generous amount of dijon on to all sides of the filets.
On a piece of plastic wrap, lay out a slice of prosciutto and spread a thin layer of mushrooms on.
Place the filet cube in the centre and wrap the prosciutto around it. Wrap well with the plastic, making sure it is tight and held together. Chill in the freezer for 10-15 minutes.
Preheat the oven to 400°F. Cut the puff pastry into strips the width of the filet packages. Unwrap the filet and place on a strip of puff pastry and bring together. Use another piece of puff pastry, placed the opposite way and bring together to encase the beef. Use a bit of water to stick pastry together.
Place wellingtons seam side down on a parchment paper lined baking sheet. Brush with the egg yolk wash. Using the back of a knife, lightly score in a leaf pattern and sprinkle with a bit of coarse salt.
Bake the wellingtons for 10 minutes, then rotate the pan and turn up the heat to 450°. Bake for another 10 minutes or until golden and puffy. Let rest and enjoy!

I Am... Butter Candle
Move over butter boards, the butter candle is here! They add light, ambiance, and, of course, butter to any table, making serving bread, steak, or anything you love to dip in butter a fun and interactive experience. If you love warm butter and fresh bread, or you love butter boards, you’ll love the butter candle.
What is a butter candle?
It’s exactly what it sounds like: a candle made of butter. A food safe wick is lit at the table and the butter slowly softens, making the butter melty, dippable, or pourable. Butter candles are typically served with bread, but you can also serve them with anything that you love with butter. For dipping you can go with: seafood, vegetables, or meats. And for pouring, think: mashed potatoes, rice, popcorn - the list goes on and on. Is there anything that doesn’t taste better with butter?Who invented butter candles?
To be honest, butter candles are a modern take on delightfully retro tallow candles, which are candles made out of beef fat. Tallow candles have existed for ages, since Ancient Rome, in fact. Lately, adventurous restaurants have started serving steak with highly flavorful edible tallow candles. The resulting melty, warm beef fat is poured over steak or served alongside potatoes. Really, it’s not that big of a jump to homemade butter candles for bread. The first version I saw on Tiktok was by Soozie the Foodie who serves hers with bread. The other one I see on repeat is the steak butter candle by SAMO. These two Tiktoks are perfect examples of the two different ways you can make butter candles.How to make a butter candle
There are two ways to make a butter candle: hand shaping and pouring. Both work well, but hand shaping is a bit more rustic looking and if you don’t have food safe gloves, I recommend going the pouring route.To hand pour a butter candle
This is definitely the easiest way to make a butter candle. Melt the butter, make a wick out of food safe twine, pour the butter in a container, and wait for it to set. That’s it!- Melt the butter. You can do this in a small pot over low heat on the stove, or in 20 second increments in the microwave, stirring every time you reset the microwave.
- Make the wick. Cut a piece of food safe string and dip it into the melted butter to create a food safe wick.
- Set the wick in the mold. Tie the buttered string around a stick or chopstick and place the stick over the top of your butter candle mold, making sure the string touches the bottom of the mold.
- Pour in the butter. Pour the melted butter into the mold, making sure the wick is in the centre of the candle.
- Let the candle set. Place the butter candle in the fridge until it’s nice and firm, at least 1 hour minimum.
- Light your butter candle on fire and enjoy. When it’s time to enjoy, remove the stick and trim the wick so it’s about 1/4 - 1/2 inch above the candle. Use a match or lighter to light the wick and let the butter melt. Enjoy the melted butter by dipping or pouring!
To hand shape a butter candle
Start with slightly soft spreadable butter. Ideally, take your butter out of the fridge and let it sit a room temp, for 20 minutes. Lay out a piece of plastic wrap and place your stick of butter in the middle. Use your hands or a rolling pin to lightly flatten the butter and place a piece of kitchen string in the middle for a wick. Use the plastic wrap to roll and shape the butter into a candle. Place in the fridge to set.Butter candle wicks
It doesn’t matter if you hand shape or pour, either way, you’ll need a food safe wick. My suggestion is 100% cotton food safe twine, the kind that you tie up roasts and chicken with. You can find it near the meat section in the grocery store or you can order it online. Because it’s food safe, it will be safe when you light your candle. All you need to do to make your food twine into a wick is dip it in melted butter so it holds a flame better.Butter candle molds
You can go store bought or homemade here. Your mold really depends on if you want to have a free standing (de-molded) candle or a candle in a container. Generally, you want a free standing or shallow candle for dipping and a container candle for pouring.Dippable butter candle mold
Depending on if you want to un-mold your candle or not, you’ll want either a disposable or reusable mold. If you’re going to un-mold your candle, you can use a paper cup that you can cut and then peel away from the butter. You can even make a cardboard tube, line it with parchment paper and tape on a bottom. If you’re going for a dippable candle that you’re going to leave in the mold, go for a shallow container that you already have at home like a ramekin or small dish. This butter crock would work amazingly for a dipping butter candle.Pourable butter candle mold
These can be anything small with a spout. We use a tiny cream pitcher, which worked really well and is incredibly cute. Anything small and pourable is useable. Small cream pitchers or espresso pourers are great and there are so many out there. These mini glass espresso pouring cups with wooden handles are super cute.Salted or unsalted butter
Most people will tell you to go with salted butter because that’s what you serve with bread, but unsalted works too, just serve your candle along with some flaky sea salt. Really, use whatever butter you love.What to serve with butter candles
Really you can serve anything. If you’re going for a starter, a nice selection of crusty breads works well. On the other hand, if you want to serve up a butter candle at breakfast or brunch, pancakes, waffles, or freshly baked muffins come to mind. If you’re serving it with dinner, melted butter tastes amazing on rice, noodles, vegetables, seafoods, and meats. Classic is a herbed butter with steak frites, you can’t go wrong with that!Butter candle flavors
Any compound butter (flavored butter), can be a butter candle. To make, simply stir the ingredients into the melted butter.- garlic butter: 1/2 cup butter plus 4 cloves finitely minced garlic or 4 cloves roasted garlic
- herbed butter: 1/2 cup butter plus 2 tbsp freshly chopped herbs of choice such as mint, cilantro, green onions, rosemary, thyme, flat leaf parsley, sage, basil, dill, tarragon, chives
- jalapeño butter: 1/2 cup butter plus 2 tbsp finely chopped jalapeño
- paprika butter: 1/2 cup butter plus 1 tsp smoked paprika and 1 tbsp fresh parsley
- shallot butter: 1/2 cup butter plus 2 tbsp finely chopped shallots, 2 cloves finely minced garlic, 2 tsp finely minced parsley
- red wine butter: 1/2 cup butter, 2 tbsp red wine, 1 tbsp finely chopped shallots, 2 tsp finely chopped parsley, 1 tsp fresh lemon zest
- lemon butter: 1/2 cup butter, 2 tbsp fresh lemon juice, 2 tsp fresh lemon zest, 2 tsp finely chopped parsley
Pro tips
- Make sure your butter candle is solid before lighting it up, otherwise you’ll just have a butter pool as opposed to a candle.
- If you’re un-molding your candle, place the candle in a shallow dish with a lip so that as it melts, it doesn’t overflow and cause a butter spill.
- Start small! Yes, you can make a butter candle with 1 pound of butter, but that’s excessive, even in this day and age. All you really need is one stick of butter (which is a 1/2 cup).
- Super smooth butter candles. If you’re a purist and want a very clean burning, pretty candle, be sure to clarify and strain your butter. Because butter has water content and milk solids, a non-clarified butter candle will sputter a little due to the milk solids. This is definitely an optional step thought and I don’t think it’s necessary.
How to Make a Butter Candle
Move over butter boards, the butter candle is here!
- Food Safe Kitchen Twine
- Small Ramekin
- 1/2 cup butter
- 1 baguette (sliced, to serve, optional)
Make your wick: tie a knot in your kitchen twine and trim off the excess, then measure out about double the height of your candle. Tie the newly cut end in a knot around your chopstick, leaving a length the same height as your candle with the original knot on the other end. Trim the excess and set aside.
Gently melt the butter in a pan on the stove over low heat. You can also melt it in the microwave in 30 second increments.
Drag the wick through the melted butter, making sure it’s saturated as close to the chopsticks as possible.
Set the chopstick over your ramekin, moving the string if needed so that it’s centered in the mold.
Pour in the butter and let set until solid in the fridge, minimum 1 hour.
To enjoy, remove the stick and trim the wick down to about 1/2 inch. You can light the butter candle as is, in the mold, or take it out of the mold by dipping the dish in warm water and running an offset spatula around the edges.
Light the candle and watch it burn as the butter melts. Enjoy with fresh crusty bread.

I Am... Mint Snowman Marshmallows
These mint snowman marshmallows are so incredibly festive and cute; they never fail to get me into the holiday mood. I think snowman marshmallows might be my favorite ever marshmallows. Especially if they’re mint flavored and homemade. If you’ve never had homemade marshmallows and you’re a fan of marshmallows in general, you need to make marshmallows from scratch. They’re like a whole other species: super soft, fluffy and plush. They just melt in your mouth. Honestly, I think clouds probably taste like super puffy marshmallows. Homemade marshmallows probably seem a bit intimidating, but they’re actually pretty simple. The only caveat is that you need a stand mixer because the marshmallow mixture is whipped for over 20 minutes and it gets super thick and fluffy which will basically make your arm fall off if you try to do it by hand.
How to make homemade marshmallows
- Prep your pan. Butter and use powdered sugar to lightly dust a pan or glass baking dish.
- Bloom the gelatin. Add the gelatin to some cold water in the bowl of your stand mixer and let sit/bloom.
- Heat up sugar, corn syrup, and water to 240°-245°F, the firm ball candy stage. If you have a candy thermometer, clip it into your pan, making sure the bulb isn’t touching the base, otherwise it’ll get a false reading.
- Slowly add the hot sugar to the gelatin in the bowl of the stand mixer. Then whip until fluffy and marshmallow-y.
- After you have marshmallow fluff, it’s time to spread it in the pan and let it cure until firm.
- After that, you can cut it out and decorate it. You did it, you made marshmallows!
Marshmallow ingredients
- Sugar - regular granulated white sugar is the bulk of this recipe
- Corn syrup - this helps prevent the sugar from crystallizing and keeps your marshmallows super soft
- Gelatin - gelatin is what’s going to set the marshmallows
- Mint extract - these guys are mint marshmallows and a little bit of mint extract is what gives them that coolminty flavor. These marshmallows are amazing in hot chocolate! If you’re not a fan of mint, feel free to use the extract of your choice
Do I need a stand mixer to make homemade marshmallows?
Unfortunately, yes. The hot sugar and gelatin mixture takes about 20 minutes to whip up on high and the fluffier it gets, the stickier and more difficult it is to whip. Our current mixer is the KitchenAid Artisan Mini and it's awesome, but sold out everywhere as of this writing. There are some available on amazon still, although refurbished.Why make snowman marshmallows
- You love projects and you’re tired of making sourdough
- You’ve never made candy before - this is a great first candy to make!
- You love marshmallows and these are pure melt in your mouth fluffiness
- You want to see little snowman faces melting away in your hot chocolate
What if i don’t have time to make homemade marshmallows?
You can make these snowmen with store bought marshmallows!- Cut jumbo marshmallows in half with a pair of scissors.
- Dip the sticky sides into icing sugar, then shake off the excess.
- Decorate with melted orange candy melts noses and melted dark chocolate eyes and mouths.
How to store homemade marshmallows
There’s no denying it, these guys have a lot of sugar in them. But, because they’re most all all sugar, they keep for a really long time. Make sure they’re in an air tight container and keep them at room temp - they’ll stay soft and squishy for up to 3 weeks. I hope you have a chance to make these little guys! They are so worth it as a pick-me up on a random winter afternoon. Their little faces melting will definitely make you squee with the cuteness.More fun holiday projects
- Super Simple Cut-Out Gingerbread Cookies
- Mini Gingerbread Houses
- Pull Apart Christmas Bread
- Peppermint Bark Crepe Cake Recipe
- Peppermint Bark Cookies
- Festive Caramel Corn and Rice Krispie Mix
- Small Batch Cookies – 1 Egg to 4 Cookies: Snickerdoodle, Chocolate Chip, Sugar, and Ginger
- Dark Chocolatey Drizzled Flaky Sea Salt Kettle Corn
- Gingerbread Corgi Cookies
Mint Snowman Marshmallows
- stand mixer
- 1 tbsp gelatin (1 envelope)
- 1 cup sugar
- 2 tbsp corn syrup
- 1 pinch salt
- 1/4 tsp mint extract
- 1/2 cup powdered sugar
- 1/4 cup candy melts (orange)
- 1/4 cup dark chocolate (chopped)
Prep
Bloom the gelatin: In the bowl of your stand mixer, pour in 1/4 cup of cold water. Sprinkle the gelatin on top and mix to moisten.
Pan: lightly butter an 8x8 inch pan, then dust with icing sugar. If desired, line with parchment paper.
Tools: Lightly butter a spatula and an offset spatula.
Marshmallows
In a pot, mix together the sugar, corn syrup and 1/4 cup water. Stir until the sugar is incorporated and wet, then bring to a gentle boil over medium high heat, swirling occasionally to distribute the heat. Heat until the mixture reaches 240°-245°F. When the sugar mix comes to temp, remove it from the heat and let the bubbles subside. Sprinkle in a bit of salt and add the mint extract to the gelatin. Carefully pour the sugar into the bowl of the stand mixer.
With the whisk attachment, turn the stand mixer to low and beat for 2 minutes. Increase the speed to high and whip until the marshmallows double to triple in size and are fluffy and white, about 10-15 minutes.
When the marshmallows are full and white and fluffy, use your buttered spatula to help pour them into the prepared 8x8 pan. Smooth out with the buttered offset spatula and lightly dust the tops with powdered sugar. Let cure in the pan for 3-6 hours.
Remove the marshmallows from the pan and place on an icing sugar dusting cutting board. Lightly butter a 1 inch round cutter and cut out snowmen heads.
Dust with powdered sugar and use melted orange candy melts and dark chocolate to pipe on eyes, mouths, and noses. Let set then enjoy as is or in hot chocolate!
Storage: Store in an air tight container at room temp for up to 3 weeks.
Estimated nutrition assumes you're not consuming all the candy melts and dark chocolate, only enough to make the snowman faces.

I Am... Tiktok Cinnamon Rolls
All you need are two ingredients for the fluffiest, gooey-iest Tiktok cinnamon rolls hack. These are the perfect lazy snack for the holidays, warm and cozy and wintery. I’ve been seeing the TikTok cinnamon roll hack all over my for you page and since I absolutely love cinnamon rolls, I had to try it. It’s super simple and promises to make extra moist and fluffy cinnamon rolls that taste just like Cinnabon.
How to make Tiktok cinnamon rolls
This cinnamon roll hack is incredibly easy, just like all viral hacks.- Preheat your oven to 350°F.
- Butter a large baking dish.
- Add the cinnamon rolls, spaced apart so they can rise and bake up fluffy.
- Pour heavy whipping cream over the tops of the cinnamon rolls.
- Bake according to the package directions.
- Add the frosting on while they’re still warm, but not hot, let cool slightly and enjoy!
TikTok cinnamon roll hack ingredients
You only need two ingredients for this hack: store-bought ready to bake cinnamon rolls and heavy whipping cream.Store bought cinnamon rolls
You want the refrigerated ready to bake rolls that come in tubes. There are so many brands out there and all of them will work, but if you want the specific ones I’ve seen on TikTok, they’re they’re Pillsbury Grands, more on that below.Heavy whipping cream
Heavy whipping cream is the secret ingredient. It adds extra moistness and richness to the buns, making they super fluffy and gooey when they bake up. They also help the tops bake up to a beautiful golden brown.What are Tiktok cinnamon rolls?
This viral hack is everywhere on Tiktok and it’s super simple: store bought cinnamon rolls baked in heavy whipping cream. The rolls bake up light, fluffy, moist, and extra gooey. The layer of heavy whipping cream bakes into the buns giving them more heft and lightness as well as helps the tops bake to a beautiful golden brown.How to open a cinnamon roll can
To be honest, opening tubes of cinnamon rolls or biscuits scares me because of the pop. I always think that the rolls are going to explode. What I like to do is, peel the outside paper off, carefully, and if that doesn’t open the package, I hold the tube and gently twist in opposite directions so the seams of the cardboard tube expands and opens. You can also gently knock it against the counter top to break the seam.Do these taste like Cinnabon?
If you want your cinnamon rolls to taste like Cinnabon, you’ve got to get Pillsbury Grands with cream cheese icing. Otherwise, all other store-bought ready to bake cinnamon rolls in the fridge section will work as well. Be sure to get the big cinnamon rolls if you want the look and feel of giant buns.Who invented the Tiktok cinnamon roll hack?
There are so many people who are doing this now and it’s kind of hard to tell who started the trend. If you know who invented it, please let me know!How to make TikTok cinnamon rolls in the air fryer
If you don’t have an oven or you’re just making one tube aka a small batch of cinnamon rolls, you can do these right in the air fryer. To bake cinnamon rolls in the air fryer, place 1 package of cinnamon rolls in a heat proof safe pan that fits in the air fryer, then pour 1/2 cup of heavy whipping cream over the tops. Air fry the rolls for 12-15 minutes at 320°F or until golden on top and cooked through. Top with frosting while still warm.How long to bake Tiktok cinnamon rolls
The good thing about these rolls is that there’s no chance of them drying out in the oven. It’s best to bake the rolls a bit longer, more towards the 30 minute mark, since they bake in cream. You want to make sure the rolls cook through completely. If you have an instant read thermometer the internal temperature of the center of the cinnamon rolls should be 190°F. If you don’t have a thermometer, gently press the center of a roll. It should feel slightly firm and not raw-dough squishy. You can also stick a toothpick or a paring knife into the middle of a roll. The toothpick should come out clean. If your buns start to brown too much without them being done, cover with foil and continue to bake.Homemade cream cheese frosting
If you want to elevate your cinnamon rolls, make a batch of homemade cream cheese. While you’re baking, it’s easy to whip up a batch. Simply mix together: 1/2 package (4 ounces) room temp cream cheese, 3 tbsp room temp butter, 3/4 cups powdered sugar, and 1/2 tsp vanilla until smooth. Frost the rolls when warm. The icing will nestles into all the cinnamon-y nooks and crannies.
Small batch Tiktok cinnamon rolls
It’s easy to make a small batch of these rolls. Just bake off one tube. Lightly butter a small baking dish. Then place the five rolls inside and pour on 1/2 cup of heavy whipping cream. Bake as per the recipe below and frost when warm.
Variations
The basic cinnamon roll hack is cinnamon rolls plus heavy cream, but here are two variations:- Extra cinnamon - melt 1/4 cup of butter and stir in 1/4 cup brown sugar and 2 tsp cinnamon. Pour over the rolls before adding the heavy cream. Bake as per the recipe.
- Pecans - melt 1/4 cup of butter and stir in 1/4 cup brown sugar and 1/2 cup chopped pecans. Top the rolls before pouring over the heavy cream. Bake as per the recipe.
Real cinnamon rolls
If you're feeling fancy and want the real deal cinnamon rolls, try these ones! Happy cinnamon roll hacking! xoxo stephTiktok cinnamon rolls
All you need are two ingredients for the fluffiest, gooey-iest Tiktok cinnamon rolls hack.
- 2 tubes store bought cinnamon rolls (Pillsbury Grands preferred)
- 1 cup heavy cream ((aka whipping cream))
- butter (for the pan)
Preheat the oven to 350°F. Lightly butter a large baking dish. Place the cinnamon rolls inside, giving them space to expand.
Pour the heavy cream on top of the rolls, making sure each one is fully coated.
Bake for 25-30 minutes or until golden brown and fully cooked through.
Remove from the oven and add the included icing on while still warm. Enjoy!

I Am... Turkey BBH Noodle Soup Recipe
Everyone knows the best part of Thanksgiving is the leftovers, especially leftover turkey. We always, always make stock with our turkey carcass, and we often use it to make this hue style turkey noodle soup. I'm all about leftovers. I mean, once, when I was at a party, someone asked how everyone liked to eat their Thanksgiving leftovers. I literally said that I like to make myself a plate that looks just like Thanksgiving dinner. I kind of got some weird looks and when everyone else answered, I realized why. Most people were saying things like turkey chili, sandwiches, turkey alfredo pasta, things like that. But really, I mean, I LOVE turkey dinner and don't understand why people get tired of it. But, as much as I love straight up leftovers, I really really like using leftovers to make entirely new dishes. Dishes like this spicy turkey vermicelli noodle soup, a take on Vietnamese bun bo hue. Hue style soup is so good. It's lemongrass-y, spicy, and incredibly addictive. If you like pho, you're in for a treat because hue noodle soup is like pho but turned up times ten. Traditionally hue noodle soup is made with beef, which is why it's called bun bo hue. Bun means vermicelli, bo means beef, and hue, well, that's an area in Central Vietnam. So, this is kind of like bun turkey hue: vermicelli turkey in a hue style soup. The best part of this dish, aside from the fact that it's delicious, is that it comes together pretty fast.
How to make hue style turkey noodle soup
- Make the stock in the oven. It doesn’t get more hands off than this and it’s perfect fo a lazy Friday you spend on the couch surfing Black Friday deals.
- Pop the turkey carcass, minus any meat left on the bones, into a large pot with lemongrass, garlic cloves, shallots, sugar, water, and fish stock. Let it hang out in a 200°F oven for at least two hours.
- While you take a break from online shopping, make some some chili oil aka satế aka what gives this noodle bowl all of its flavor. It’s garlicky, spicy, and full of lemongrass flavor.
- Blend up lemongrass, shallots, garlic, and chilis in a food processor, then add everything to a small pot with netural oil and gently simmer. Remove from the heat, then mix in chili flakes, sugar, and fish sauce. Let cool.
- When your stock is done, cook some thick vermicelli, add a scoop of satế to your bowl, top up with noodles and leftover turkey. If you have herbs (cilantro, mint, sliced green onions, thinly sliced red onions, or Thai basil) it will absolute be a win.
What is bun bo hue?
A spicy noodle soup from Central Vietnam, specifically the Hue region. Bun bo hue, or BBH as those in the know call it, is herbaceous beefy lemongrass stock seasoned with a spicy saté (sauce). Thick, round vermicelli noodles swim in the red hued soup and tender slices of meat and fresh herbs punch everything up. It’s spicy, savory, sour, and sweet all at once. Balanced, yet in your face full of flavor. Here, instead of the classic beef stock we’ll make a lemongrass turkey stock then flavor it with a chili oil that has lemongrass, shallots, garlic, fish sauce, and two kinds of chilis. It’s seriously delicious. Happy leftover-ing! xoxo stephHue Style Turkey Noodle Soup
Turkey Lemongrass Soup Stock
- 1 turkey carcass
- 3-4 stalks lemongrass (bruised and cut into 4" lengths)
- 2 cloves garlic
- 1 shallot (halved)
- 1.5 tbsp sugar (or ~20 grams of rock sugar (preferred))
- 8-9 cups water
Lemongrass Chili Oil
- 1/2 cup neutral oil
- 1-2 tbsp red pepper flakes (divided)
- 2 shallots (minced)
- 6-8 cloves garlic (minced)
- 1/4 cup lemongrass (minced)
- 1 tbsp sugar (or ~10 grams of rock sugar (preferred))
- 2 tbsp fish sauce
- 1 tbsp shrimp paste (optional, see notes)
To Finish
- 12-16 oz dried rice vermicelli (look for thick hue style noodles)
- 1 lb leftover turkey (sliced or chopped)
- red onion (thinly sliced)
- mint (roughly chopped, optional)
- cilantro (roughly chopped, optional)
- green onions (sliced, optional)
- 1 lime (cut into wedges)
Make the stock: Adjust the racks in the oven so a large pot can fit in the middle and heat to 200°F. Place the turkey, lemongrass, garlic, shallot, and sugar in the large pot and top with water. Bring to a gentle simmer, then very carefully transfer to the oven, uncovered, and cook in the oven for 2 hours.
Meanwhile, make the chili oil: in a small, deep sauce pan, heat the oil and chili peppers over medium low heat, stirring often, until it smells aromatic. Remove from the heat and strain with a mesh strainer. Add the oil back to the pan along with the shallots, garlic, and lemongrass. Cook over medium heat, stirring, until the shallots just begin to soften, about 2-3 minutes. Remove from the heat and stir in rock sugar until dissolved, then stir in the red pepper flakes, fish sauce, and shrimp paste.
Remove the stock from the oven and carefully strain into a large pot. Season it with fish sauce, by the tablespoon until it is aggressively seasoned but not overly salty, about 3-4 tablespoons. Keep the stock on a low boil.
Assemble: Cook the noodles according to the package. Drain well and place the noodles in large warmed bowls and top with about 2 cups of the spicy lemongrass broth, 1-2 tablespoons of chili oil (to taste), and leftover turkey. Add sliced red onions, mint, cilantro, green onions, and lime to taste. Add more chili oil if you like it hot!
You will definitely end up with more chili oil than stock so you can save it for another round of whatever soup you might have on hand. Enjoy :)
The shrimp paste can be found at most asian grocery stores. It’s quite smelly on its own but essential if you want an authentic flavor.
Estimated nutrition (esp the sodium) will be highly dependent on your seasoning and how much soup you consume.

I Am... Coconut Chicken Curry
Coconut chicken curry is one of my all time favorite comfort foods, especially this version: Malaysian-ish coconut curry chicken. The saucy, coconutty curry sauce spooned onto rice is so, so good. This is my ultimate chicken curry: flavorful and savory, with a hint of spice and a coconutty base; tender, large, juicy pieces of chicken; soft and tender potatoes that still hold their shape; and a sauce thick enough to coat a spoon but not so thick that it doesn’t flow over rice easily.
This chicken curry recipe is the best of all worlds
This curry is a mix of Malaysian, Singaporean, and Indonesian styles. It’s thickened with coconut milk, seasoned with fish sauce, and scented with lemongrass, star anise, and cinnamon. A flavor bomb of savory with just a hint of sweet and spice. It’s 100% a labor of love: hand pounded aromatics, a custom mix of spices, and a slow gentle simmer, long enough for the oils to separate out and float on top for those glorious pools of seasoned oil on top of the saucy yet thick coconut curry sauce.How to make coconut chicken curry
- Make the curry paste. Crush all lemongrass, garlic, shallots, ginger, and Thai chilis together with a mortar and pestle. You can use a food processor too. Stir in the curry powder, turmeric, chili flakes, and a bit of oil.
- Marinate. Let the chicken absorb ALL the flavors. Longer is better, but at least 30 minutes.
- Sear. Give the chicken skin a nice golden sear. This also fries the curry paste a bit to bring out the flavors.
- Simmer. Simmer everything together until the chicken is juicy and cooked through and the potatoes are nice and tender, about 1 hour.
Chicken curry ingredients
It looks like you need a lot for this chicken curry, and I’m not going to lie, the ingredient list is on the longer side, but it’s well worth the shopping and time investment. Along with the standard chicken, potatoes, garlic, ginger, coconut milk, and chicken stock, you’re going to need the following:- Lemongrass – These days you can find lemongrass paste at the grocery store, but the flavor difference between chopping your own and store bought is intensely different. It’s better to stick with fresh lemongrass: just pull out your favorite knife and go to town.
- Shallots – Shallots are going to add a bit of extra sweetness and onion flavor without onions. They’re sweet and mild and used extensively in Southeast Asian food.
- Curry Powder – Try to buy a Malaysian curry powder mix from an Asian grocery store but if you can’t, regular curry powder will do.
- Turmeric – A bit of turmeric goes a long way. It’s healthy, earthy, and adds a sunny orange hue to the curry. Turmeric is an absolute must for curry.
- Cinnamon stick – A whole cinnamon stick adds a bit of warmth and a bit of sweetness.
- Star anise – Use whole star anise when you’re simmering the curry, the slight licorice bitterness really compliments all the other flavors.
- Fish sauce – Instead of salt, we’re going to be using fish sauce to season. It’s rich and full of umami and really enhances the chicken flavors.
Optional
- Thai chilis – These little red peppers pack a punch. I love adding fresh chilis to curry because it brings the heat, but if you’re head adverse, you can leave these out or seed them.
- Crushed Chinese chili flakes – Really you can use any crushed chili flakes, but Chinese crushed chili flakes have less seeds and are toasted in such a way that the smokiness and pepper flavor really shines through.
- Lime leaves – These are optional because I know how difficult it can be to find fresh lime leaves. If you do find them, they will add a light citrus freshness.
The sign of a good curry
Those pools of oil on top are a sign of a really good curry, by the way, if you’re asking Malaysians or Singaporeans or Thai or Indians or anyone who knows curries. You want your coconut milk and spices to split into two: a flavorful infused oil and a rich, dense, coconut base. When your curry splits, it means that all of the excess water that was in the coconut milk has evaporated and your curry is now concentrated, leaving only the flavorful good stuff.Is this chicken curry spicy?
A good chicken curry is adaptable – you should be able to make it spicier if you’re a spice fiend, and slightly milder and sweeter if you’re looking for a comforting easy curry. If you don’t want it spicy, leaving out the fresh and dried chilies will make this a family friendly affair.Instant pot chicken curry
To make chicken curry in the instant pot instead: After the chicken has been marinated, heat up 2 tablespoons of oil in the Instant Pot insert over saute high. When the oil is hot, sear the chicken, skin side down, until golden. Flip the chicken skin side up and add the coconut milk, chicken stock, cinnamon stick, star anise, and lime leaves. Cook on high pressure for 10 minutes. Quick release when the cooking time is done and reduce the liquid on sauté high if desired.Crockpot chicken curry
To make chicken curry in a crockpot instead: After the chicken has been marinated, heat up 2 tablespoons of oil in a frying pan. When the oil is hot, sear the chicken, skin side down, until golden. Remove the chicken from the pan and add to the slow cooker. Stir in the coconut milk, chicken stock, cinnamon stick, star anise, and lime leaves. Cook on low for for 4 to 5 hours.Curry powder
If you’re feeling ambitious, you can make your own curry powder at home. You’ll need:- 2 tablespoons coriander seeds
- 1 tablespoon cumin seeds
- 2 whole cloves
- 1 tablespoon fennel seeds
- 1 tablespoon whole black pepper
- 2 inch cinnamon stick, broken into pieces
- 1 tablespoon crushed Chinese chili flakes
- 1-2 whole cardamom pods
- 5-6 dried Chinese chilis
- 3 tablespoons ground turmeric
What to serve with chicken curry
Sometimes I like to have some lime on the side to squeeze some freshness on and serving up cucumbers with this is a pro move, the fresh juicy crunchiness of a good cucumber plays nice with the spice. I hope you give this curry chicken a try. It’s near and dear to my heart. kari ayam and roti prata forever! xoxo stephCoconut Chicken Curry
Slightly spicy, coconutty and comforting Malaysian curry chicken.
Curry Paste
- 2 stalks lemongrass (sliced)
- 4 cloves garlic (minced)
- 2 shallots (peeled and chopped)
- 1 tbsp ginger (minced)
- 2 tbsp curry powder (Malaysian/SE Asian preferred)
- 1/2 tsp ground turmeric
- 1/2 tsp red pepper flakes (Chinese preferred)
- 1 Thai bird’s eye chili (sliced, optional (or more, you monster))
- 2 tbsp oil
For the Curry
- 2 tbsp oil
- 8 chicken thighs (bone-in, skin-on)
- 3-4 potatoes (small, peeled and quartered)
- 1 cinnamon stick
- 2 star anise pods
- 5 lime leaves (optional)
- 1.5 cups coconut milk
- 1/2 cup chicken stock
- 1 tbsp fish sauce
- 2 tsp brown sugar
Crush lemongrass, garlic, shallots, ginger, and Thai chilis in a mortar and pestle (or a food processor but it'll be less tasty) until it resembles a paste. Stir in curry powder, turmeric, crushed chili flakes, and 2 tablespoons oil. Coat chicken throughly with the curry paste and let marinate for 30 minutes.
In a large dutch oven, heat up another 2 tablespoons of oil and fry the chicken, skin side down, until golden. Flip the chicken skin side up and add the potatoes. Stir in coconut milk, chicken stock, cinnamon stick, star anise, and lime leaves.
Bring to a gentle simmer and cook for 1 hour, or until chicken is soft and tender. Season with fish sauce and brown sugar and enjoy!
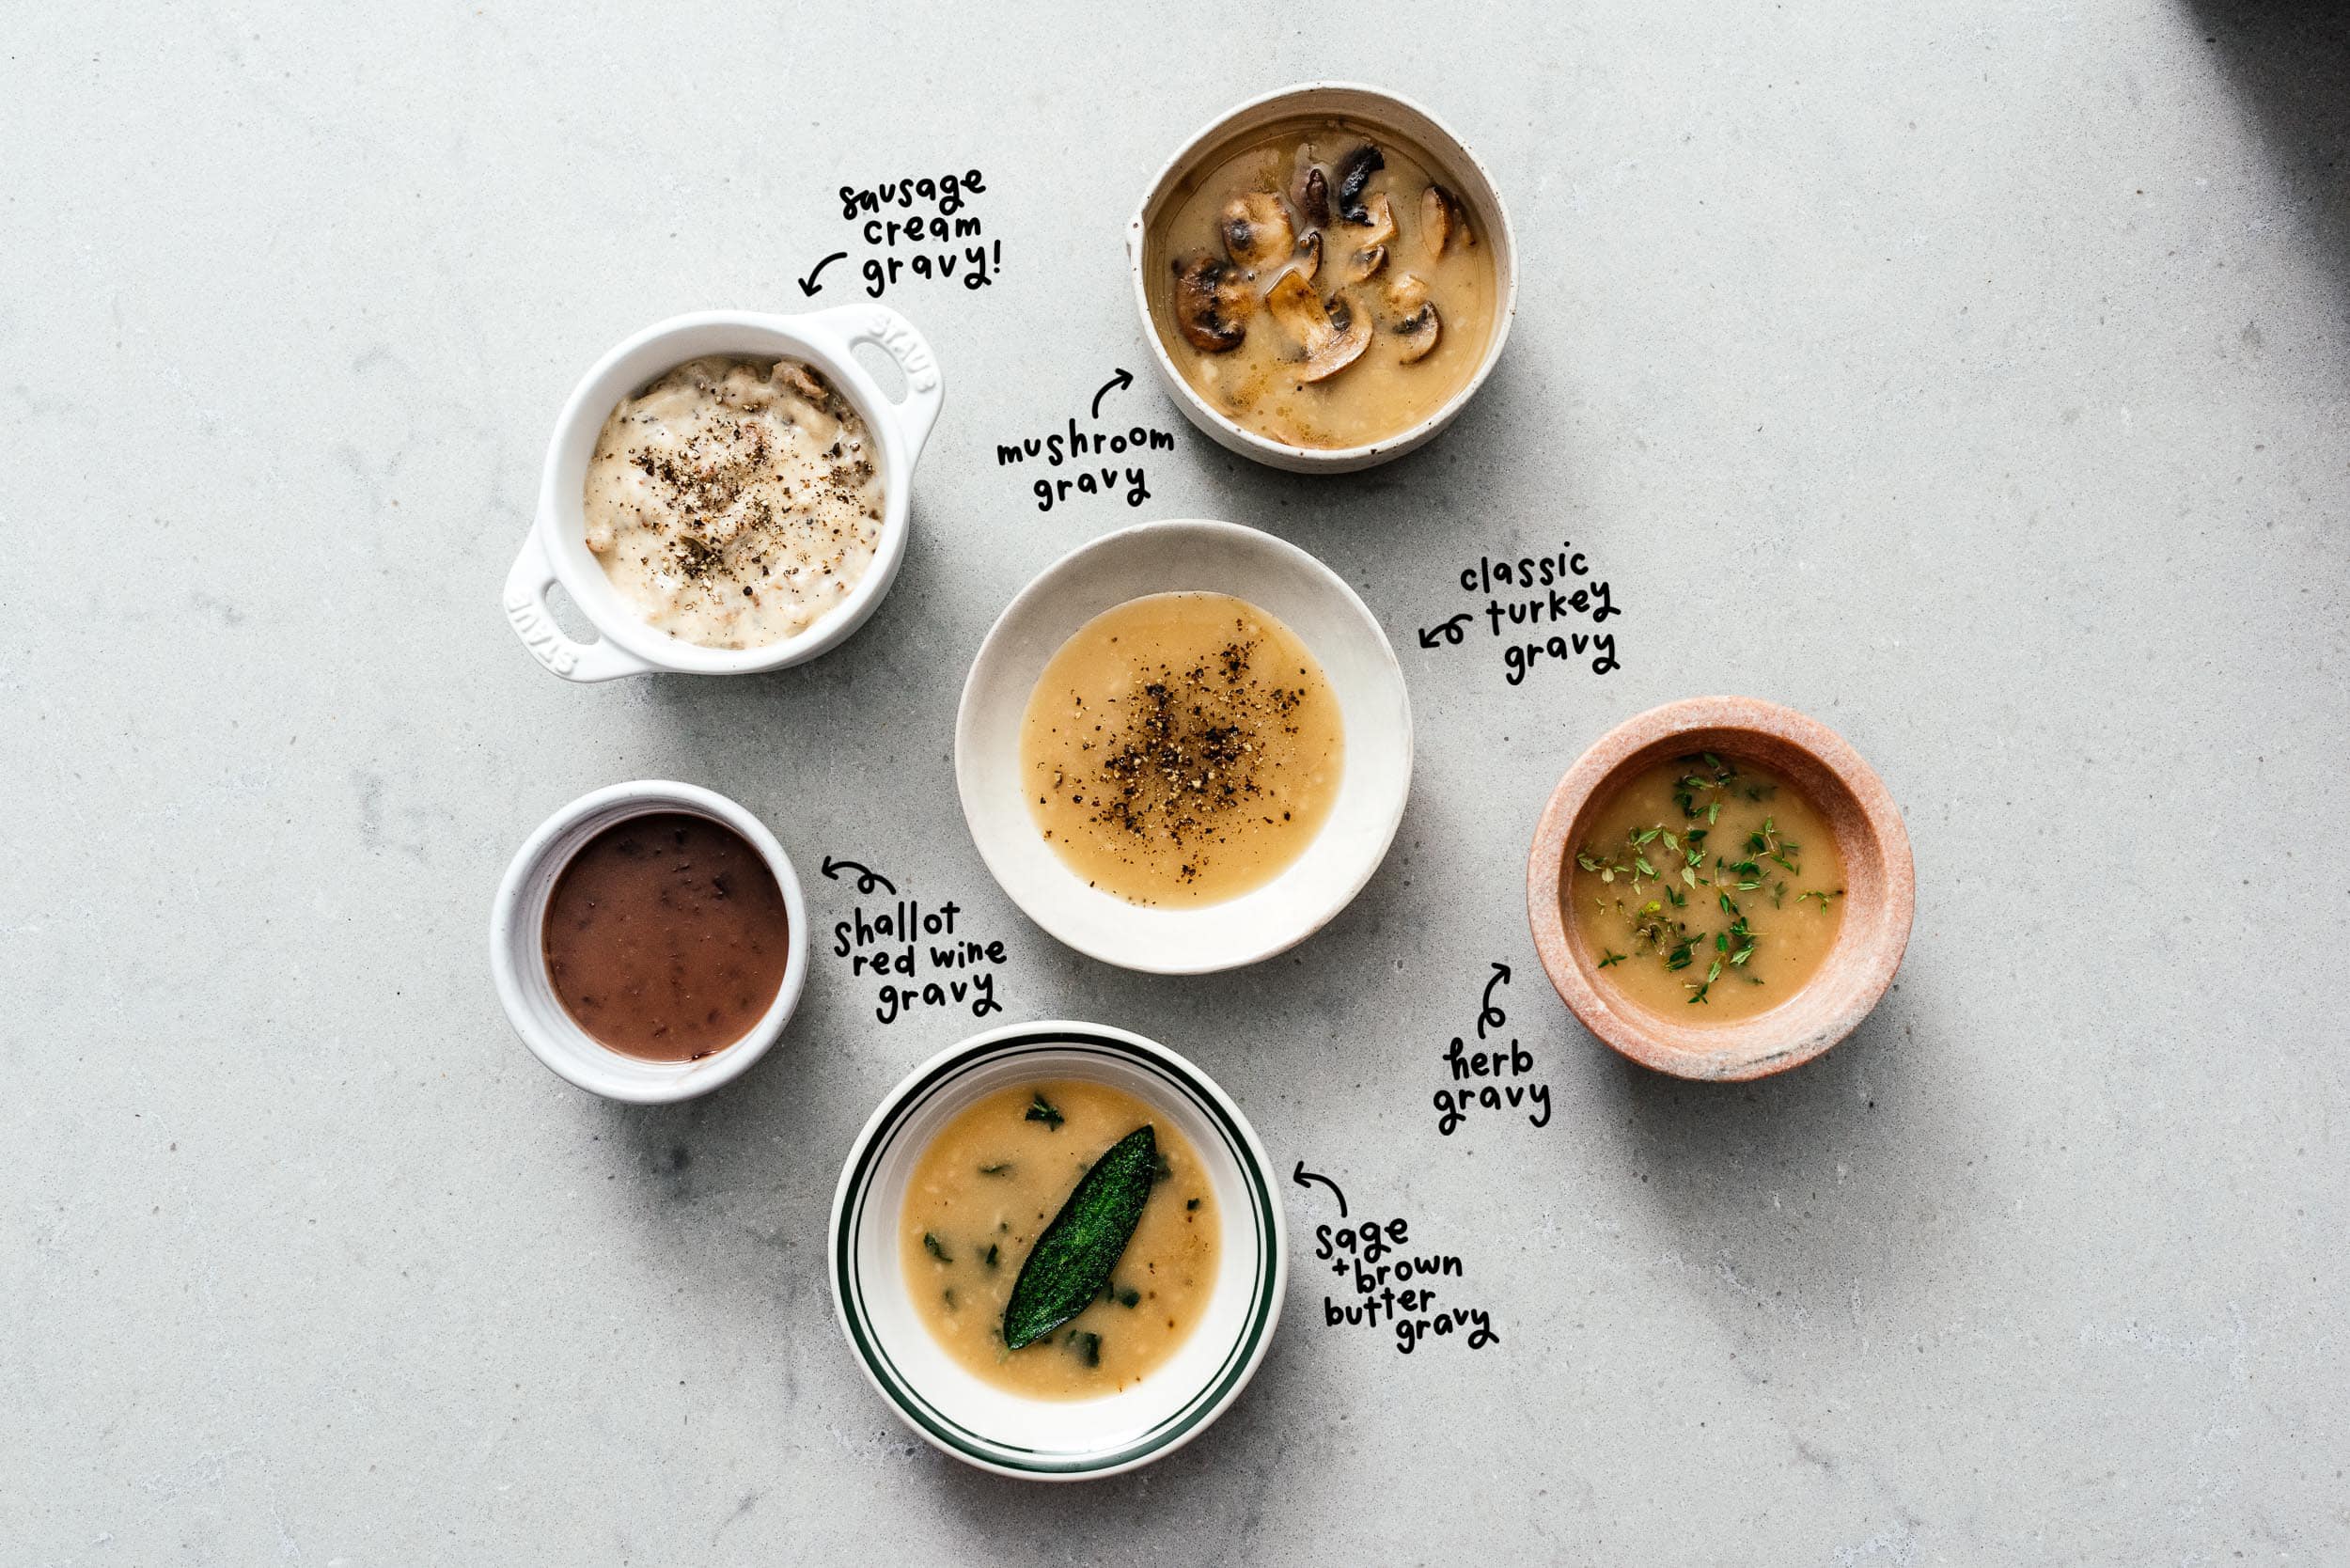
I Am... 6 Easy Perfect Gravy Recipes
Gravy 101: Tips, tricks, and all your pressing gravy questions, answered, and 5 gravies you can make that are a little bit different than the usual. I am a huge gravy fan. Make it rain gravy! I like my food saucy, not dry. A little pot of glistening, glossy gravy should be on the side of every meal. It's such a integral part to a good meal, especially a good holiday feast. Don’t settle for bad, lumpy, flavorless gravy. I never realized gravy was such a contentious food item until one year, while we were over at a friend's place, someone drunkenly took over the gravy making. It ended up lumpy and lifeless and Thanksgiving dinner, while far from being ruined, went from spectacular to very mid. The host had graciously let the guest make the gravy but I could see the pain in his eyes. Gravy is the soul to a good holiday meal. Give your holiday meal a good soul. Make the best gravy you can make.
What is gravy?
At its simplest, gravy is a sauce. A super simple sauce made from three things: fat, flour, and liquid. It's easy to make but far too often people turn to those little powdered packs because they’re scared of lumps. Don’t fear lumps friends. If your gravy ends up a bit lumpy, you can just strain it with a fine mesh strainer! Don’t let lumps stop you.Gravy ratio
This is my personal golden ratio. Not too thin, not too thick, the goldilocks zone is always the best.- The golden ratio: 1:1:12 1 tbsp fat to 1 tbsp flour to 3/4 cup (12 tbsp) liquid.
- If you like it thinner, go for: 1:1:16 1 tbsp fat to 1 tbsp flour to 1 cup (16 tbsp) liquid
- If you love it thicker, go for: 2:2:16 2 tbsp fat to 2 tbsp flour to 1 cup (16 tbsp) liquid
How to make gravy
-
- Heat up the fat over low heat in a pan.
- Sprinkle on the flour and whisk in to make a roux.
- Cook the roux until light brown while whisking or stirring. The roux will look like a sandy paste.
- Slowly stream in stock or drippings while whisking constantly. Whisking constantly during this step eliminates lumps!
- Bring the heat up to medium-high and cook, until the gravy starts to thicken, whisking occasionally.
- Taste and season with salt and pepper!
What kind of fat?
You can use the fat that comes off your meat when you cook it or you can use butter. Really, any kind of fat works: bacon fat, sausage fat, fat from roasts, any fat goes.What are drippings?
Drippings are the liquid at the bottom of your roasting dish when you make a roast. They’re a mix of fat and meat juices and have a huge amount of rich flavors. To separate the fat from the stock, carefully strain and transfer your drippings to a liquid measuring cup. The lighter stuff floating on top is fat and the darker stuff underneath is stock or meat juices.What if my roast doesn’t have any drippings?
Sometimes you roast a piece of meat and there are no drippings. Maybe your roast was lean or on the small side. Help out your future self by adding a tiny amount of no-sodium stock to your pan while you roast, about 1/4 inch or so. The resulting drippings will be supplemented by the fat and meat juices from your roast. If you need to top up your drippings, just pour the drippings into a liquid measuring cup, scoop off the fat, then top it up with no sodium broth or bouillon.What is a roux
A roux is a mix of butter and flour cooked together into a paste that can thicken liquids. There’s a bunch of science behind why it works but all you need to know is: roux is flour and fat.The secret ingredient to the best gravy
You can get a great boost of color and umami thanks to one of my favorite ingredients ever: soy sauce! Soy sauce will make your gravy naturally deliciously golden brown and add just a hint of umami in the background. Just add 1-3 teaspoons at the end when you’re seasoning, depending on how much color and saltiness you want.What if I don’t want to use flour?
Cornstarch gravy
If you’re gluten free or just avoid flour in general, you’re probably wondering, can I avoid flour? The answer is yes, you can make cornstarch gravy using the slurry method. Cornstarch is glossy and shiny without the opaqueness that you get from flour. It’s a bit lighter on the palette and silky smooth. Some people swear by it, some people think it’s a travesty. I think cornstarch is great! It’s never ever lumpy so if you’re a novice gravy maker, cornstarch is for you:- Make a slurry: whisk together 1 tbsp cornstarch with 1 tbsp water until smooth.
- Bring 3/4 cup of drippings (you can leave some fat in there for flavor) up to a simmer in a pot over medium heat.
- Whisk the slurry into the drippings and let come to a simmer.
- Taste and season.
Variations
Classic is best, but if you want a couple of fun flavors, these are here for you!Sausage Gravy
Remove one sausage from its casing and cook in a heavy bottomed skillet, breaking into pieces, until brown and cooked through. Whisk in the flour and cook lightly. Slowly stream in 3/4 cup milk while whisking. Let simmer and thicken. Season generously with freshly ground pepper.
Herbed Gravy
Finely chop some fresh sage, thyme, and rosemary and stir in at the end, when you’re seasoning.Mushroom Gravy
Cook sliced mushrooms in the butter. Add an extra tablespoon of butter and whisk in the flour and cook lightly. Slowly stream in the stock while whisking. Let simmer and thicken.Red wine and shallot gravy
Melt the butter, then add the shallots and cook until soft. Whisk in the flour and cook lightly. Slowly stream in a mix of 3/4 cup stock and 1/4 cup wine while whisking. Let simmer and thicken.Sage brown butter gravy
Melt the butter and add the sage leaves. Let the butter brown over low heat. When nutty and aromatic, whisk in the flour and cook lightly. Slowly stream in the stock while whisking. Let simmer and thicken.What to serve alongside
- Gravy and crispy potatoes always!
- And um, am I the only one who likes to drown their stuffing in gravy?
- Turkey is always a good choice
- English roast, anyone?
- Biscuits and gravy will forever be the BEST breakfast
If you really love gravy
- Crispy Chicken Fried Steak Bites with White Wine Sausage Gravy
- Köttbullar med Gräddsås: Swedish Meatballs with Cream Sauce
- The Ultimate Breakfast Poutine: Fries, Crispy Quail Eggs, Cheese Curds and Bacon Gravy
Classic Gravy Recipe
Classic gravy with soy sauce to boost the gravy-ness of your gravy to new gravy heights.
- 1 tbsp butter (or fat from drippings, or other fat, see notes)
- 1 tbsp flour
- 1 cup chicken stock (no sodium preferred, or pan drippings)
- 1 tsp soy sauce (optional)
Add the butter to the pan and melt over medium heat.
Sprinkle on the flour and whisk in. Cook for 1-2 minutes until lightly golden and sandy.
Slowly whisk in the drippings or stock and cook, whisking constantly until the gravy starts to thicken.
Which thick and gravy-ful, remove from the heat and season with salt and pepper, stirring in the optional soy sauce, if using. Enjoy warm!
Other fat options: bacon fat, sausage fat, fat from roasts, any fat goes.

