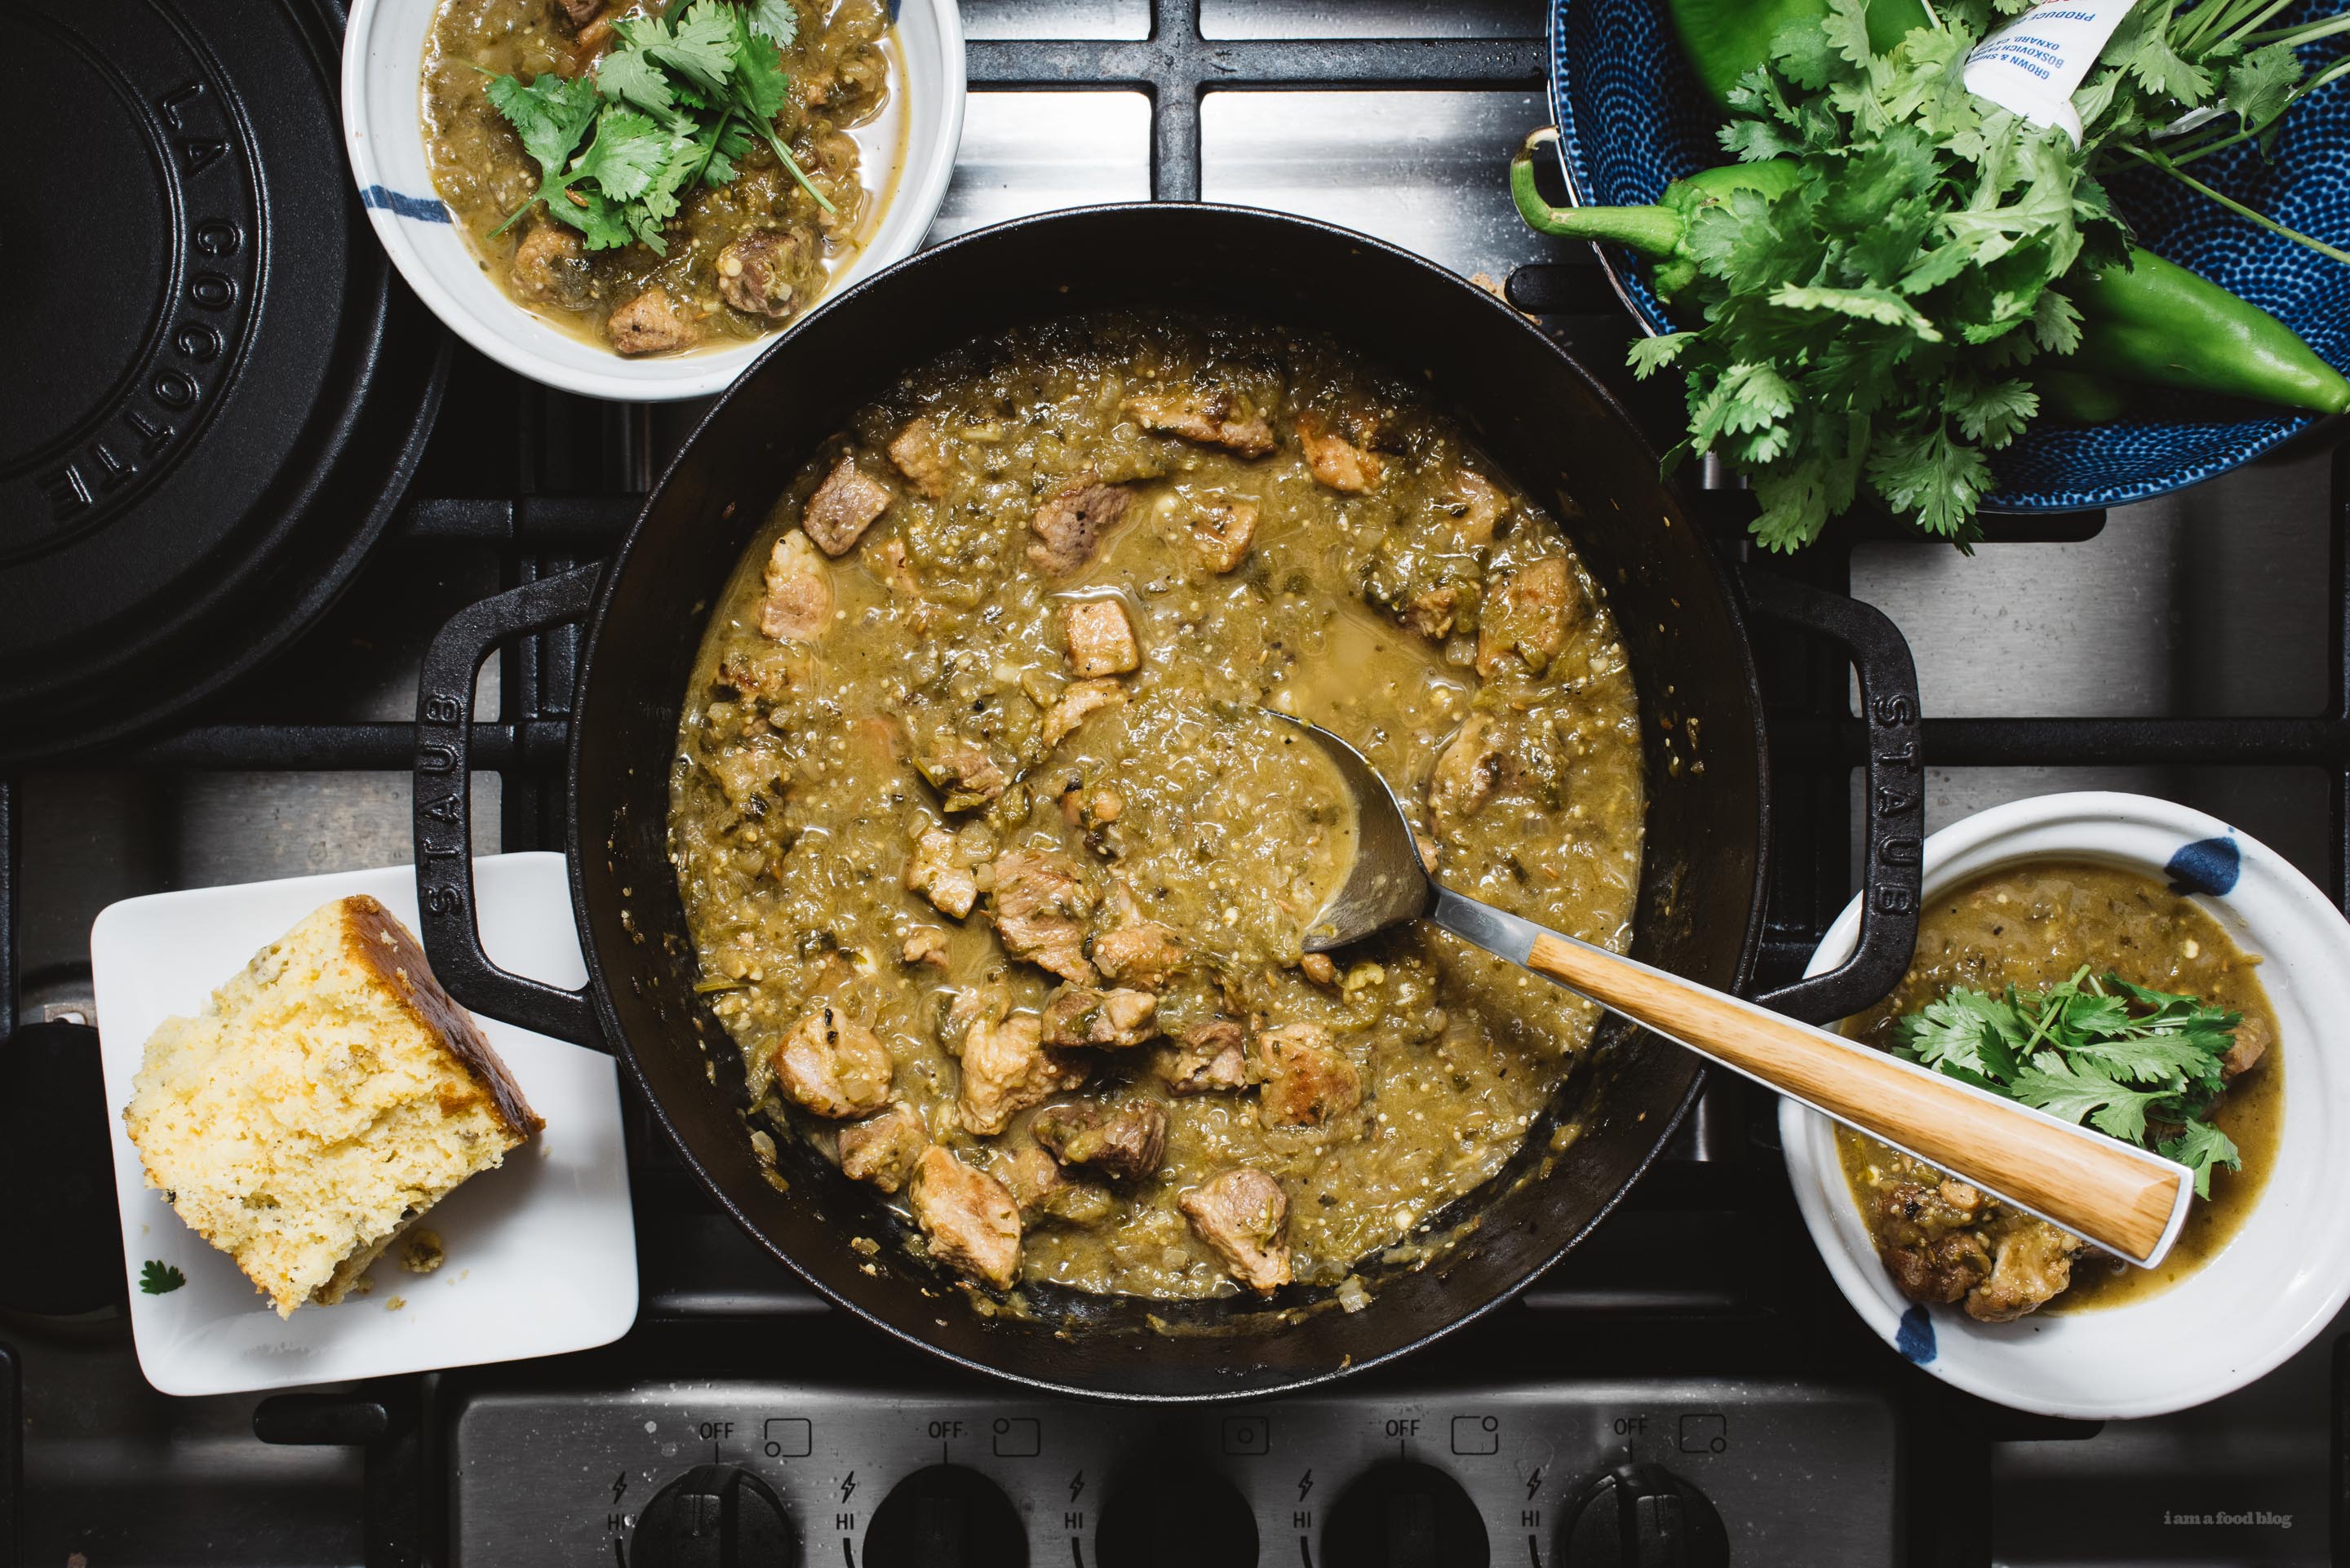
I Am... Easy Hatch Green Chile Verde Recipe
I have to admit, I'm not sure whether green chile/chile verde is officially from Colorado, New Mexico, or somewhere else in the southwest. What I am sure of is that it's incredibly, impossibly good. If you've never tried it, it's like Texas chili but lighter, brighter, and way more fun (not dissing Texas chili though, I love Texas chili).
Green Chile Stew
In New Mexico this is just called pork stew, and for me it's the best version of pork stew I've ever had. I thought our favorite tonjiru from Tokyo might put up some competition, but after tasting this version, it was a hands down clear winner.Tomatillos in green chile
Tomatillos are not really a traditional ingredient, but the smokiness of the roasted tomatillo pairs perfectly with the chiles and is what makes this specific version stand out, for me.Hatch vs other green chiles
This recipe uses Hatch chiles because it's Hatch chile season, but if you don't live near the southwest, you can use Anaheims + a spicy green chile of your choice (such as jalapeño, serrano, and my favorite: thai). If the first half of the recipe looks familiar, that's because it's our 4 Ingredient Hatch Chile Salsa Verde, meaning you can double those ingredients and have yourself some awesome salsa to serve on the side.Best cut of pork for stew
The cut on pork used here is pork shoulder. I had to take off the skin and trim it off the bone, but if you can find boneless pork shoulder, it will make this recipe far far easier. This recipe works equally well in a slow cooker, Instant Pot, or in a dutch oven on the stove. I've never tried it at pressure an instant pot, but on the slow cook setting with the lid slightly open it should work exactly the same as a slow cooker. The photos are shot in a dutch oven because #aesthetics.Cooking time
Last note: I tasted this at 2 hours, 3 hours, and 3.5 hours. At 2 hours it's super bright and floral, you can really taste the chile, and the pork is still a little chewy in a wonderful way. By 3.5 hours the flavors are more melded together, the chile is more mild, and the pork is not quite fall apart tender but super soft. I liked both and I gave the win to 3.5 hours, but you should taste it at 2 and see if you like it, because who doesn't love to eat a little earlier? It makes room for second dinner.Super Easy Slow Cooker Chile Verde
This Easy Slow Cooker New Mexico & Colorado Hatch Chile Verde Recipe may be the best pork stew you’ve ever tasted
- 1 cup hatch chiles (about 4)
- 4 lb pork shoulder/butt (trimmed and cubed)
- 1 lb tomatillo
- 6 cloves garlic
- 1 cup fresh cilantro (about half a bunch)
- 1 medium onion (diced)
- 1 tbsp cumin
- 2 cups chicken stock (no sodium/unsalted preferred)
- tbsp oregano (Mexican oregano preferred, optional)
Trim your pork butt and cube it. Season well with salt and pepper and set aside.
Set your oven to broil. Wash and dry your tomatillos and hatch chiles. Rub them with oil (any oil is fine) and place in oven. Flip them when they are toasted to your liking and do the other side. This took 18 minutes in our oven at 550ºF.
While you are waiting for your peppers to roast, brown your pork shoulder cubes in your dutch oven on high heat or your slow cooker on high/saute. Work in batches to avoid crowding. Once all the pork is browned, move it to a plate and set aside. Be sure to use a timer so you don’t forget about the chiles roasting in the oven, or check back after every batch of pork.
Once the peppers are done, put them in a ziploc bag to steam for 10 minutes. Transfer the tomatillos along with cilantro, garlic, and a little salt to a blender and set aside.
Once you are done browning the pork, reduce heat to low and cook your onions. When the onions are translucent, add the cumin seeds and continue cooking for another 2 minutes to toast them. Then add the pork, all accumulated juices on the plate, and the chicken stock.
Remove the chiles from the bag and peel them. It’s not necessary but highly suggested that you also seed them with a small spoon. Once the chiles have been peeled and seeded, put them in the blender and puree. Once the salsa verde is pureed to your liking, combine it with the rest of the ingredients, mix well, and simmer for 2-4 hours.
In the last 1/2 hour of cooking, taste the chili and adjust seasoning, and if you are using oregano, add it in now.
Serve with cilantro, tortillas, and rice, or just enjoy by itself.
Serves 4 as a main or 8 as a side. Estimated nutrition is for a side portion.

I Am... Crispy Oven Baked Honey Garlic Tofu Bites
Honey Garlic Tofu Bites: exceptionally crispy golden oven-baked tofu nuggets coated in a sweet and savory honey garlic sauce. Tofu has got to be my ultimate favorite protein. Healthy, quick, convenient, and so easy to keep multiple packages in the fridge. I’ve loved tofu forever and now that Mike is a total tofu convert, it’s a big part of our meal plans! I love tofu so much that I will eat it straight out of the package with just a touch of really good soy sauce and a huge pile of thinly sliced scallions. If I’m feeling like a sweet, savory, garlicky, crispy snack I’ll make these honey garlic tofu bites. Quick, easy, and so satisfying. Pair them with some fluffy rice or whole grains and greens for a honey garlic tofu bowl and live your best life.
What kind of tofu for tofu bites?
I like using firm tofu for tofu bites because it’s firm enough to keep its shape and it has a nice, pleasing texture. You can also use medium but I wouldn’t use silken or soft as it’s too fragile.Tofu from firm to soft:
- Extra firm tofu - holds its shape exceptionally well, perfect for crumbling, frying, grilling, and using in stir fries.
- Firm tofu - holds it’s shape and super versatile, great for pan frying, braising, and stewing.
- Medium tofu - smooth and a little soft. You can purée it easily for soups, dips, and sauces. Also tastes amazing in braises, soups, and stir fries.
- Soft/Silken tofu - very smooth and delicate. Best for mapo tofu, miso soup, or other soups and stews. Also delicious with just soy, ginger, and scallions!
How to press tofu
Pressing tofu gets all the excess liquid out and makes it easier to crisp up. It also makes the tofu more dense and chewy. It’s a super simple step. If you’re using extra firm tofu, you can skip this step and just pat the tofu dry.- Open and drain the tofu, then fold up a clean tea towel or paper towels so they’re roughly the same shape as the tofu.
- Place the towels on a cutting board or plate and put the tofu on top. Top with another layer of folded towels.
- Place a second cutting board or plate on top and weight it down with a heavy bowl. Let sit for 15-30 minutes, changing the paper towels if needed.
- Use the tofu in your recipe!
Freezing tofu
Freezing tofu draws out the moisture and gives it an even meatier, firmer texture. When you freeze tofu the water inside turns into ice, making small holes. The holes can soak up marinades and flavor like a sponge and the texture of frozen then thawed tofu is firm and chewy. If you want to try it, drain the tofu, slice it into the end shape, then freeze it. Once you thaw it, squeeze out any extra water and braise, bake, stir fry, deep fry, marinate, or anything your heart desires.How to make tofu crispy
Make sure you dry it out. Moisture is the enemy of crispiness so give your tofu time to sit on some clean kitchen towels or paper towels and dry the surfaces throughly. Cornstarch! It’s what gives tofu a craggy coating and bakes up to crispy, crunchy perfection. You can also use potato starch or sweet potato starch. Starch is the key to crispy tofu because when heated, it creates a network of molecules that holds it’s structure.Substitutes for honey
If you want to make this vegan, you can easily substitute the honey for maple syrup so you have a honey maple tofu! Just do a 1-for-1 swap.Oven baked honey garlic tofu
Bake these up in a hot 400°F oven and flip them half way through. Because cornstarch doesn’t brown very much, you can give the tofu a light misting or brushing of oil if you want them to be super golden brown. I didn’t brush them because the sauce coats the bites and makes them glossy and golden, but it’s up to you!Pan fried
In a deep non-stick frying pan, heat up a neutral oil over medium heat. When hot and shimmery, add the coated tofu and cook until crispy and golden, flipping on all six sides.Air fried honey garlic tofu
Lightly oil or use cooking spray on the air fryer basket. Place the coated pieces of tofu in the basket, with at least 1/4” of space in between pieces. Lightly spray the tops of the tofu with cooking spray. Cook at 400°F for 5 minutes, then flip and lightly spray with extra cooking spray. Cook for 5 more minutes at 400°F.Deep fried honey garlic tofu
Prepare a wire cooling rack over a paper towel lined rimmed baking sheet. Heat up 2 - 2.5 inches of oil in a deep heavy bottomed pot until it reaches 325°F. It doesn’t need to be too deep, just enough to cover the size of the tofu. Use a pair of tongs to gently add a couple of pieces of tofu to the hot oil, being careful not to overcrowd. Fry in batches until lightly golden, about 2-3 minutes. Remove from the oil and let rest on your prepared wire rack.Honey garlic sauce
After the tofu is crispy, it’s time to sauce and toss. Simply warm up the honey, along with minced garlic, and soy sauce until bubbly and thick.More honey garlic and more tofu recipes
- 5 Ingredient Honey Garlic Chicken
- Mapo Tofu
- Sundubu Jjigae/Spicy Kimchi Soft Tofu Stew
- Tofu Fried Tofu Vegan Chicken Nugget Recipe
Honey Garlic Tofu Bites
Only 5 ingredients for a quick and tasty weeknight protein!
- 1 lb pressed tofu (1 package, see notes)
- 1 tbsp cornstarch
- 2 tbsp honey
- 1 tbsp soy sauce
- 3 cloves garlic (minced)
- black pepper (freshly ground, to taste)
- green onions (sliced, to garnish)
- toasted sesame seeds (to garnish)
Preheat the oven to 400°F. Dry off your tofu with a paper towel and cut into 1/2 inch cubes. Toss with the cornstarch and arrange the tofu on a parchment paper lined baking sheet.
Bake for 30-45 minutes – midway through, flip the tofu cubes.
When you have just 5 minutes left on the baking time (at that point your tofu should be a light golden brown) start the sauce. In a small frying pan, heat up honey, soy and garlic over medium heat until bubbly and thick. Taste and season with freshly ground pepper.
Remove the tofu from the oven and toss in the sauce. Garnish with sliced green onions and toasted sesame seeds. Enjoy hot!
You can substitute regular medium or firm tofu, just cut it and place it on clean paper towels, flipping every so often until it removes most of the excess moisture.
I Am... Salted Egg Yolk Fried Chicken
If you love fried chicken and all it’s variations, you’re going to love this absolutely addictive salted egg yolk fried chicken. It’s crunchy, juicy, and full of savory umami flavors.
You’re probably thinking one of two thoughts right now:
1. Yasssssss, salted egg yolk anything, give it to me!! 2. What the heck is salted egg yolk?What is salted egg yolk?
For the uninitiated, salted egg yolk is the yolk from a salted duck egg. Salted duck eggs are a super popular Chinese ingredient. They’re made by soaking duck eggs in a salt brine, which helps preserve and creative flavor. Essentially they’re cured duck eggs. After brining, the duck eggs get a salty (duh) aroma with a firm gelatinous egg white and a perfectly round firm golden orange yolk. You can buy them at the Asian grocery store both already cooked (they’ve been steamed or boiled) and uncooked. You’ll usually see the eggs with congee, added to stir fries, and steamed dishes. Maybe you’ve seen them in mooncakes? Since they’re so golden and round, they’re the symbolic full moon inside lotus paste and red bean mooncakes.What does salted egg yolk taste like?
They’ve been called parmesan-like and while I get the comparison, they don’t taste anything like parmesan. They’re rich and punchy, with a salty-sweet savoriness that is hard to describe. When cooked (usually steamed) they take on a slight graininess, almost like the crystals in a really good cheese, which is probably why the parmesan comparison is floating around.Why use salted egg yolk?
Just like parmesan, salted egg yolks are incredibly versatile. You can simply grate cooked egg yolks on to pasta, toast, or anything else you want to add a bit of oomph too. When you add salted egg yolks to a sauce, you’ll get an extra unctuous oozy cream, with so much umami. Salted egg yolks are also a sweet ingredient too – you’ll find them molten and golden in liu sha bao (egg custard buns), croissants, cookies, bread, ice cream, french toast, macaron, you name it, it’s probably been salted egg yolk-ed. Salted egg yolks are intensely beloved in Asian, especially Singapore. There’s been a glut of salted egg yolk foods and while some people think it’s a trend, it’s one that’s not going anywhere soon. It’s nice that such a traditional ingredient (it was first mentioned in writing in the 6th century) is still so beloved.Salted egg yolk fried chicken
Alright, now we can get to the meat of it - this salted egg yolk fried chicken is essentially crispy deep fried chicken nuggets in a savory-sweet salted egg yolk sauce. You mash steamed, sunshiny orange salted egg yolks which turn into a deliciously rich and creamy and crumbly salted egg yolk sauce that hugs and coats every nook and cranny of the crispy fried chicken bits. If you’ve never had salted egg yolk fried chicken you’re in for a treat. It’s SO GOOD, especially the little salted egg yolk nubbins.Ingredients for crispy salted egg yolk fried chicken
- Chicken. Chicken thighs are ideal - they’re juicy and take longer to cook compared to breasts which tend to dry out when deep fried. Cut the chicken into evenly sized pieces so everything cooks at the same rate.
- Egg white. Regular egg whites and cornstarch together are classically used in Chinese cooking as a technique referred to as “velveting.” Velveting gives you tender, juicy meat, and creates a crispy deep-fry batter.
- Soy sauce. Just a touch of soy sauce for umami in the marinade.
- Shaoxing wine. Shaoxing wine adds that classic aroma found in all good Chinese cooking. If you don’t have any, you can omit it, but it really adds an extra layer of flavor.
- Cornstarch. Cornstarch in the batter and as a dry coat for the chicken before it gets deep-fried makes chicken extra crispy and golden due to the fact that it doesn’t have gluten in it.
- Oil. Use a high-smoke point oil for deep frying.
- Salted egg yolks. The star ingredient! More on salted egg yolks below.
- Butter. This is the backbone of the salted egg yolk sauce and gives it fluidity and viscosity. I always buy unsalted butter so I can control the salt levels.
- Thai chilies. This is an optional ingredient but if you like spice this will add an extra layer of deliciousness! If you’re spice adverse, you can still add the chilies, just be sure to de-seed them first. Or you can skip them entirely.
- Sugar. Add a pinch or so of sugar to balance out the savoriness of the salted egg yolks. You don’t have to add sugar but I find that salty-sweet combination irresistible.
- Curry leaves. Fried curry leaves add extra aroma and crunch. If you can’t find curry leaves, use Thai basil, which is what I did!
Where to find salted egg yolks:
You can buy salted egg yolks at your local Asian grocery store in the section where the regular eggs are. They look like regular eggs but in plastic egg trays with 6 to a pack. They come both cooked and raw, try to find the ones that are “raw.” With the raw eggs, you can crack them open separate out the yolks and rinse them under cold running water before steaming. For the cooked eggs, you’ll have to peel the eggs, then remove the cooked egg whiles because you only need the yolks for the sauce. If you live in a place that has a super large Asian grocery store, you can even find just salted egg yolks - they come in a vacuum sealed package, usually in the frozen section. This is what I like to use!How to make salted egg yolk fried chicken
- Prep the salted egg yolks. Separate the egg whites from the yolks. If your salted eggs are raw, simply separate the way you would a normal egg. Once you have just the yolk, steam it in a dish over high heat for 10 minutes. It should be firm and cooked through. If your salted egg yolks come from the store cooked, try to remove a much as the whites as possible. Crumble the cooked yolks with a fork until very fine and set aside.
- Prep the chicken. Cut the chicken up into even bite sized pieces. In a bowl, whisk the egg whites with a bit of cornstarch until light and frothy then add the chicken pieces, soy sauce, and shaoxing wine. This is going to marinate for about 15 minutes.
- Fry the chicken. While the chicken is marinating, heat up your oil in a heavy deep pot and set up a wire rack over a baking tray or plate. When the oil is hot, toss the chicken into cornstarch then add to the hot oil and cook until golden and crispy. Remove and let rest on the wire rack.
- Make the sauce. In a pan, melt some butter over very low heat. When it’s all melted, add the crumbled salted egg yolks and stir. The butter and egg yolks will bubble up. Stir in some chopped chilis (if using), a pinch of sugar, and some curry or Thai basil leaves. Add in the fried chicken and toss to coat. Time to eat!
Extra saucy salted egg yolk fried chicken
This fried chicken is not on the super saucy side, but, if you’re a sauce fiend and want your chicken drowning in sauce, you can feel free to double the sauce part of the recipe!What to serve with salted egg yolk fried chicken
Salted Egg Yolk Fried Chicken Recipe
An Iconic Chinese Fried Chicken
Chicken
- 1 lb boneless skinless chicken thighs (cut into bite sized pieces)
- 1 egg white (see note)
- 1/2 tbsp light soy sauce
- 1/2 tbsp Shaoxing wine
- 1/2 cup cornstarch
- High heat oil for deep frying
Salted Egg Yolk Sauce
- 4 salted egg yolks
- 3 tbsp butter
- 1-2 Thai bird’s eye chili (deseeded and finely chopped, optional)
- 1-2 tsp sugar
- 10-15 curry leaves (or Thai basil)
Separate the salted egg yolks from the whites. Steam the yolks over high heat for 10 minutes until cooked through, then crumble with a fork until very fine. Set aside.
Marinate the chicken: whisk together the egg white with 1 tablespoon cornstarch until light and frothy. Add the chicken, soy sauce, and shaoxing wine and let marinate for 15 minutes.
Place a rack over a rimmed baking sheet lined with paper towels. Heat 2 inches of oil in a high-sided, heavy bottomed pot over medium high heat until oil reaches 350°F.
Scoop the chicken out of the marinade and toss in the remaining cornstarch. Use a pair of tongs to gently add the chicken to the hot oil in batches, being careful not to crowd the pan. Cook until golden brown, crispy, and cooked through, about 3-4 minutes, flipping as needed. Drain the chicken on your prepared rack and keep warm in the oven.
When all the chicken is cooked and keeping warm in the oven, make the sauce: In a frying pan, melt the butter over very low heat. Add the mashed salted egg yolks to the butter and cook until it starts to foam up.
Stir in the chili, sugar, and basil/curry leaves. Add the chicken and toss to coat evenly and enjoy immediately!
The egg white for the chicken batter is just a regular egg white, not salted.

I Am... Super Easy Vietnamese Chicken Curry Recipe
There might be nothing in the world better than traditional Vietnamese curry served with a giant pile of fresh, warm, and pillowy-soft Vietnamese baguettes. Curry came to Vietnam a long time ago, and while it’s a little less well known than its Thai cousins, it’s no less delicious and super easy to make. I grew up with this curry. Sort of. My mom's "a little of this and a little of that" recipes didn't really work for me so I've had to recreate them all as an adult. Luckily I can check how close my versions are to hers just by asking my mom for a batch of hers. This one hits while not using many special ingredients.
Vietnamese Curry Cooking Notes
- Leaving the chicken out while you marinate it lets it come to temperature for more even cooking. If the idea of this makes you squeamish, you can marinate in the fridge, but then you’ll need to add additional cooking time.
- You can add any kind of vegetables to this in addition to the potatoes. Tradtionally we go with carrots. The optional powders are just if you have these items in your pantry. The chili powder we use is Indian red chili powder, which is very very spicy.
- Because this is dinner & chill, I left out the lemongrass because it’s not too common at the average grocery store, but if you come across some while shopping, pick a stalk or two up, slice into 2” long lengths, and add it to the broth.
- Some of the commenters below noted that you might need more stock, so I've changed the recipe to read 2-4 cups of chicken stock from the original 2 cups.
What do you need?
Just a pot.How do you serve Vietnamese curry?
Serve with rice or baguettes to dip. Bonus points if you can find fresh Vietnamese baguettes from a local Vietnamese deli. It’s also traditional to serve this with pho noodles, in which case you should double the chicken broth and seasoning to make enough for two bowls.Other Vietnamese recipes to try
- A Very Authentic Vietnamese Lemongrass Beef Recipe
- Bun Bo Hue: Maybe Better than Pho?
- Easy Instant Pot Pho
- Spicy Noodles: Vietnamese Garlic Lemongrass Edition
- How to Make Vietnamese Salad Rolls
Easy Vietnamese Curry
A super easy dinner & chill weeknight favorite of mine
- 2 lbs bone in skin on chicken thighs
- 4 cloves garlic (crushed)
- 3 tbsp curry powder
- 1 tbsp neutral oil (plus extra for frying)
- 1 tbsp fish sauce
- 2 tsp garlic powder (optional)
- 2 tsp chili powder (optional)
- 1 shallot (diced)
- 1 lb potatoes (or other root vegetables of choice, cubed)
- 2-4 cups chicken stock (or as needed, see notes)
- 2 bay leaves
- 1 can coconut milk (5.6oz/165ml/the small can)
Marinate your chicken with half of the garlic, 2 tablespoons curry powder, 1 tablespoon of oil and 1 tablespoon of fish sauce. If you’re using garlic and chili powder, add one teaspoon of each as well. Let sit on the countertop while you to prep the vegetables or for as long as 2 hours.
In a medium-sized saucepan or saute pan over medium high, heat up 1-2 tbsp of oil and brown your chicken on both sides. Remove and set aside.
Reduce the heat to medium and add the shallot and remaining garlic and fry for a minute or two. Stir in the vegetables, the remaining curry powder, and the remaining chili and garlic powder, if using. Fry for a few minutes more.
Add 1/2 cup of chicken stock and scrape with a wooden spoon to deglaze the bottom of the pan.
Add the chicken, bay leaves, and enough chicken stock to just halfway cover the chicken (about 1 cup, but it depends on the size of the pot you use). Cover partially with a lid and simmer for 30 minutes.
Add the coconut milk and simmer, partially covered, for another 15 minutes, then adjust seasoning and serve.
Several people have said they prefer 1l/4 cups of stock so I've added that here.

I Am... A Very Authentic Countryside Bún Bò Xả Ớt – Vietnamese Lemongrass Beef Recipe
Bún bò xả ớt is an iconic Vietnamese lemongrass chili beef. Sweet, smoky, delicious, and traditionally served up with rice, noodles, or in salad rolls.
It's a story but it's not long
Long ago my grandmother took me to the farmer's market and shared this recipe with me...just kidding. But, not really. My family is from the deep, deep countryside of Vietnam - a tiny fishing village along the coast where no tourists ever visited. My mom kept baby ducks and baby pigs as pets and forebade my grandma from killing them for dinner. Like in France and anywhere else, countryside-folk and seaside-folk take food far more seriously than city-dwellers do. In her part of the world, my mom is famous for this dish. When she was younger, it’s what she would make for dinner parties and celebrations. A few years back, she visited some old friends in Melbourne. They invited a large bunch of people who all came from the same little village, and, you guessed it, asked her to make it for them. Steph doesn’t really know it, but it was even a housewarming gift my mom gave us when we moved in together: a 5lb brick of the chicken version of this stuff to be kept in the freezer and made as-needed. Steph always asked for more, but it never happened because my mom essentially retired from cooking.This specific lemongrass beef recipe
I would love to say that this recipe came from my mom, but it would only be a half-truth. When I was younger, I asked her how to make this and got the usual “a little of this and a little of that.” I’ve since refined it into the recipe below over the years. It's informed and inspired by the taste of my mom’s version, and tastes very similar, but modernized. Honestly, I like my version better for its ease, simplicity, and reproducibility by anyone-ness. My mom’s version will always be nostalgic for me, but this new version is my go-to. Although, maybe it’s time to invite my parents over for lunch with a big case of out-of-retirement pre-marinated meat and experience the nostalgia all over again. Note: this recipe is for the vermicelli noodle bowl version because that’s how people know it, but my family would just family-style all the components around a tabletop grill and roll everything into salad rolls at the table.What is bò xả ớt?
Bò xả ớt means beef with lemongrass and chili. It’s a favorite dish in Vietnam and increasingly famous in the rest of the world. It’s charred, smoky, lemongrassy, sweet, and slightly spicy beef, usually served as part of a vermicelli bowl or in a rice plate, or as the central protein of a salad roll party, although that’s usually more done at home. If you can find the DIY salad roll version in a restaurant, you’ve struck gold.What cut of beef should you use for lemongrass beef?
The best cut of beef for bò xả ớt is a bit of a contentious debate. My mom would say triple AAA USDA prime ribeye. The internet says flank or skirt steak. I say, you are overcooking the heck out of this, it won’t matter. Get the cheapest steak you would like to get. Chill your beef thoroughly before slicing, and don’t be afraid to pop it back in halfway through if it gets warm. You want fairly thin slices, 1/8" or less. If you are buying from a butcher or a good grocery store with a meat department, they might do it for you.Grilling vs Frying
In much of Vietnam, the correct way to cook any meat is grilled over hot coals, or these days, gas. I agree. If you can be bothered to turn on the bbq, you should do so. If you have a tabletop grill, these also produce excellent results (and is how we eat it when we have dinner with my parents on their deck). But, I’ve also tried frying it literally every way: in cast iron, in stainless steel, in nonstick, and in a wok, and I can confidently say some of the easiest and best results come surprisingly from nonstick. The charring you see in these photos come from a nonstick–except the one below, which is cast iron.Mortar and Pestle
If you have the equipment and willingness, a mortar and pestle goes a long way towards authenticity, both to the Vietnamese-ness of this recipe and to the countryside-ness of it too. Chopping doesn't release the flavors and juices the way a good crushing in a mortar and pestle does. It's completely optional, and you can just chop away, but to me, the mortar and pestle makes all the difference.Spice level
One of the words in the name of this dish means 'chili'. Even in Vietnam, central Vietnam is known for some super spicy food. But it doesn’t need to be super spicy if you don’t want to fry your tongue. I’ve given the appropriate amounts in Thai chili to make this a pleasant amount of spiciness (my mom’s version would have 4x as many chilies), but if you don’t like spice, swap the Thai chilies out for another red chili of choice, including bell peppers if that is what you like. I hope you try this dish, it’s one of my personal soul food meals. If you like it, please share it widely, because there are some truly terrible versions floating around the internet, though I’m sure that’s the case for any cuisine. —lemongrass is my drug of choice MikeThe Best Bún Bò Xả Ớt - Vietnamese Lemongrass Beef Recipe
Smoky umami goodness in a bowl.
- 1 lb beef (eg cheap sirloin, thinly sliced 1/8" thickness)
- 3 tbsp sugar
- 1" ginger (minced, about 30g/2 tbsp)
- 6 cloves garlic (crushed)
- 2 stalks lemongrass (minced, about 30g/2 tbsp)
- 8 Thai chilies (sliced, or other red chili of choice)
- 3 tbsp fish sauce (see note)
- 1 tbsp oyster sauce
- 1 tbsp oil
Optional Components for the Noodle Bowl
- 4 portions vermicelli
- 1/4 English cucumber (thinly sliced)
- 1/4 cup lettuce or cabbage (thinly sliced)
- 4 wedges lime
- 1/4 cup cilantro (roughly chopped)
- 1/4 cup mint (roughly chopped)
- 1/4 cup fried shallots (commercially available)
At least 1 hour before (overnight is better), marinate the beef: crush 1 tablespoon of sugar, half the ginger, 2 cloves of garlic, half the lemongrass, and 1 Thai chili in a mortar and pestle. Combine with the thinly sliced beef, along with 1 tablespoon each of fish sauce, oyster sauce, and oil. Mix well, then cover and store in the fridge.
At the same time, make your fish sauce: combine the remaining 2 tablespoons of sugar, 1 tablespoon of ginger, 4 cloves of garlic, and 2-4 Thai chilies (as comfortable) in a mortar and pestle. Crush into a fine paste, then transfer to a jar along with 2 tablespoons of fish sauce and 1 cup of water. Store in the fridge.
When you are ready to eat, cook your vermicelli to the time indicated on the package (usually 3 minutes), then drain and rinse well with cold water. Set aside. Prepare your vegetables. In the photo, I used quick pickled cucumbers, purple cabbage, lettuce, cilantro, lime, and fried onions.
To make quick pickled cucumbers, thinly slice 1/4 of an English cucumber, then toss with 1 teaspoon salt and 1 tablespoon sugar. Let sit for 15 minutes, then rinse in cold water.
Heat a large nonstick skillet with 1 tablespoon of oil over medium heat. Fry your remaining 1 tablespoon of minced lemongrass until crispy and golden brown, then drain and set aside, reserving the oil.
Add the marinated meat to the skillet and fry until well charred on both sides. You may need to do this in batches depending on the size of your nonstick skillet.
Arrange vermicelli, vegetables, and beef in a bowl. Toss with 1/4 cup of the fish sauce, then top with fried lemongrass, fried shallots, a squeeze of lime, and sliced chilies, as desired.

I Am... How to Make Vietnamese Salad Rolls
Salad rolls have got to be one of my favorite things to make and eat. Note: Are you looking for crispy crunchy deep fried (aka imperial) rolls? If so, please check out this post! If you’re looking for fresh Vietnamese spring rolls, also known as summer rolls, salad rolls, Vietnamese rice paper rolls, rice paper rolls, cold rolls, or gỏi cuốn, please read on:
What are salad rolls?
Super healthy and easy to make Vietnamese salad rolls, or gỏi cuốn, are a traditional dish that usually contains pork, prawns, vegetables, and vermicelli wrapped up into a roll made with rice paper. There are literally thousands of variations and they’re completely adaptable and customizable. They’re served fresh with a sauce for dipping, either a mixed fish sauce or a peanut sauce. You can have them for lunch, dinner, snacks, or as appetizers. Salad rolls go by many names: gỏi cuốn (which means salad rolls) and nem cuốn (which means meat rolls), rice paper rolls, summer rolls, Vietnamese rolls, crystal rolls, soft rolls, cold rolls, and fresh rolls. Partially the names are because of imperfect translation to English and partially it's a (North American) regional thing.How to have a salad roll party
If you’re never made them before, it might seem intimidating, but making salad rolls is one of the easiest, healthiest meals you can make at home. The traditional way to enjoy salad rolls is to have all the prepared ingredients at the table. Then you make and eat them as you go, a la minute. Here’s how to do it:- Gather your ingredients. You’ll need: rice paper, vegetables, protein (this is optional), and sauce ingredients. The best thing to do is make a list, go shopping if you need to, and have everything ready to go.
- Make the sauce. Start off by making a simple fish sauce vinaigrette for dipping. Mince 1 clove garlic and lightly mash with 1-2 tbsp sugar. Stir in 1 cup of water, 1 tbsp fresh lime juice, and 2 tbsp fish sauce. Mix together until the sugar dissolves, then set aside.
- Prep the vegetables and vermicelli. Wash and dry the lettuce, cilantro, mint, and basil. Slice or julienne the cucumber. Bring a pot of water to boil and cook the vermicelli according to the package, then drain, rinse, and drain well.
- Prep the protein. Slice the chicken (or whatever protein you prefer, you can go with pork shoulder, sirloin, shrimp, or tofu) into strips. Add the chicken to a bowl with sugar, ginger, garlic, lemongrass, fish sauce, oyster sauce, and oil. Let marinate for 15 minutes minimum.
- Lay out the table. If you are so inclined, set up a heat source in the middle of your table to cook your meats, otherwise, precook them just before setting the table so they're as hot as possible. Arrange your meat, vegetables, and rice paper on communal plates as in the image below. Fill a wide bowl or two with warm water to dip the rice paper in. Find enough sauce bowls for everyone to have their own sauce. Grab a plate for each person, some drinks, and roll the night away.
- Roll and enjoy!
Tips, tricks and frequently asked questions
What is rice paper?
Rice paper, known as bánh tráng in in Vietnamese, is a edible wrapper made from rice (and sometimes tapioca) flour. They’re sold dehydrated and you rehydrate them at home in water before using them. They’re used for spring rolls, imperial rolls, in salads, and grilled as rice crackers. They come in all different sizes and as well as the common round ones they sell squares, triangles, and half circles too. We like to keep them in the package and only take a few out at a time since they curl when exposed to air. Our favorite brands of rice paper are: Three Ladies, Rose Brand, and May.How to prepare rice paper
The best way to prepare rice paper is to have a large shallow bowl of hot tap water. Take a sheet of rice paper and dip it in the water so it’s completely submerged and remove it immediately. Lay it to a plate or cutting board and let it sit for 5-10 seconds where it will rehydrate and become pliable and soft.Tips for soaking rice paper
- Don’t overdo it. You don’t want to soak your rice paper or it will become soggy and disintegrate or become very fragile making it extremely difficult to roll.
- Dip. All you need to do is take the sheet of rice paper, dip it in, making sure the rice paper is submerged and then take it out and lay it flat. The water that clings to the rice paper will rehydrate it completely. Don’t listen to the blog posts out there that tell you to soak rice paper for 10-15 seconds - you’ll end up with a soggy mess!
- You don’t need boiling hot water. Use hot tap water or even just warm water. If your water is too hot the rice paper will become too soft.
- Look at the ingredients. If you’re having trouble with wrapping up your salad rolls, look at the ingredients on your rice paper package. Rice paper with tapioca in it has more give and chewiness (like boba!) so it’s easier to wrap. Rice paper make from 100% rice is a little bit more difficult for beginners to work with.
- Use a large shallow bowl or rimmed baking sheet. It’s easier to slide rice paper into a shallow bowl of water as opposed to a regular bowl, so hold the rice paper and just turn to dip it in the water. Alternatively, you can get one of these rice paper holders/water dipping bowls. They’re upright so all you do is dip the rice paper in and rotate it in the water.
How to roll salad rolls
Rolling a salad roll is super similar to rolling a burrito so if you’ve done that before you’re going to be great at it. The tighter your roll (without tearing the paper), the better!- Dip. Take your sheet of rice paper and dip it into water, then immediately remove and place on a flat surface, either a plate or cutting board. The rice paper won’t be completely soft yet, but will rehydrate as you arrange your ingredients.
- Arrange. Place your fillings on the bottom third of the rice paper. Pro tip, what you put down first will be visible on the outside of the roll.
- Fold. Fold the bottom up and over the filling, holding it down then fold the sides in towards the center, covering the filling.
- Roll. Roll up from the bottom to the top, tucking and rolling, dip and enjoy!
Salad roll ingredients
Protein
The best thing to do for protein is marinate it and fry it. Lots of salad roll recipes out there are just boiled/pan-fried protein but the way to layer flavors is to marinate your protein before cooking it. Our favorite is a classic sweet and spicy marinade. It works great on all proteins and tastes absolutely amazing! Make the marinade, add your protein (seafood, chicken, pork, beef, tofu), marinate for 1 hour minimum, then simply pan fry or grill.Vegetables
Think leafy greens like green leaf lettuce, red leaf lettuce, butter lettuce, iceberg lettuce, cabbage, spinach, etc. Crunchy/firm vegetables work too, just make sure to cut them into sticks: cucumbers, carrots, peppers, radish, daikon.Fruit
Things like sliced mango, peaches, or avocado can add a light sweetness to your rolls. Crunchy fruits like julienned apples, pears, or apple pears are good too.Herbs
Herbs are absolutely essential. At the bare minimum you need cilantro and basil, preferably Thai basil. We also like mint and shiso. Scallions are good too. There are a whole other bunch of Vietnamese herbs you can get too – if you have a Vietnamese grocery store in your town, they should have a large selection.Noodles
When we’re making salad rolls at home we rarely use noodles, instead we prefer to fill our rolls with vegetables, but if you are going to be using noodles, thin rice vermicelli is what you want. Just cook it according to the package directions, drain and rinse well.What to dip your salad rolls in
The dipping sauce is considered to be the most important part of salad rolls.Fish sauce vinaigrette
This is our preferred dip of choice: sweet, sour, salty and full of flavor. In a bowl or glass measuring cup, crush together 1 clove garlic, 1 Thai chili or habanero (optional), and 1-2 tbsp sugar. Stir in 1/2 cup water, the juice of 1/2 lime, and 2 tbsp fish sauce. Mix until the sugar dissolves. Adjust the ingredients until you're happy. More on nuoc mam here.Peanut sauce
Creamy and nutty, you can make this with peanut butter or like we do: almond butter. In a small bowl, mix together 2 tbsp hoisin sauce, 1 tbsp smooth peanut butter (or other nut butter),1 tbsp lime juice, 1 minced clove garlic, and 1-2 tbsp water. If you want it spicy, stir in sambal oelak to taste.Hoisin sauce
Keep it simple and just serve up with some hoisin amped up with lime, garlic, and a bit of sugar. In a small bowl, mix together 1/4 cup hoisin sauce, 1 tbsp sugar, the juice of 1/2 lime, 1 clove minced garlic, and 1-2 tbsp water.Why make salad rolls at home?
There are so many reasons you should make salad rolls at home instead of ordering them at restaurants, and the best one is freshness! Honestly nothing beats a freshly made salad roll. Trust me when I say that there is a huge difference in the way a freshly rolled salad roll tastes. The rice paper is soft and chewy, the meat is warm, and the vegetables are crisp and crunchy. Plus, when you make salad rolls at home, you get to customize them exactly how you want with your personal favorite fillings and dips. Restaurant salad rolls tend to be a generic, please-everyone recipe, but making them at home means your roll is suited to you and you alone. The ratio of veggies and which protein your roll is filled with is up to you. Even the size/thickness of the roll is up to you. And, there’s just something nice about a long, slow, communal DIY meal. It brings people closer.Can you make salad rolls ahead of time?
You can but the rice paper won’t taste as fresh and they tend to get a bit firm. If you want to make them ahead of time, make sure you individually wrap each roll in plastic wrap otherwise they’ll dry out. If you try to leave them together they’ll stick together and tear so individually wrapping is the only way to go. They will keep in the fridge, individually wrapped and put in a covered container for up to 3 days. That's it, hope you have a wonderful, healthy, and delicious salad roll party!Vietnamese Salad Rolls
Authentic super healthy and easy to make fresh Vietnamese salad rolls.
Protein
- 1 lb chicken (thinly sliced, or other protein of choice such as sirloin, pork shoulder, whole shrimp, or firm tofu)
- 1 tbsp sugar
- 1 tbsp ginger (minced)
- 2 cloves garlic (crushed)
- 1 stalk lemongrass (minced)
- 1 Thai bird’s eye chili (sliced, optional)
- 1 tbsp fish sauce
- 1 tbsp oyster sauce
- 1 tbsp oil
Rolls
- 12 rice paper (round preferred)
- 12-24 leaves lettuce (red or green leaf preferred)
- 1/2 English cucumber (julienned)
- 12 sprigs cilantro
- 24 leaves mint
- 24 leaves Thai basil (optional)
- 2 bundles rice vermicelli (optional)
At least 1 hour before (overnight is better), marinate the protein: crush 1 tablespoon of sugar, the ginger, garlic, lemongrass, and Thai chili (if using) in a mortar and pestle. Combine with your protein of choice with the fish sauce, oyster sauce, and oil. Mix well, then cover and store in the fridge.
Add a bit of oil to a skillet and fry your protein until well charred on both sides, in batches, depending on your skillet size. Remove from the pan. Alternatively, grill your protein until cooked on a tabletop grill or teppan.
One at a time, dip the rice paper into a bowl of warm tap water. Lay it out on a flat surface. To the bottom third of the round, add a leaf or two of lettuce, then the protein, a small amount of vermicelli, vegetables, and herbs.
Fold up the bottom of the rice paper wrapper up and over the filling. Fold in the two sides over the filling.
Roll up, from the bottom of the roll towards the top, tucking and rolling. Repeat as needed and enjoy dipped in your sauce of choice.
Estimated nutrition assumes chicken breast as the protein.
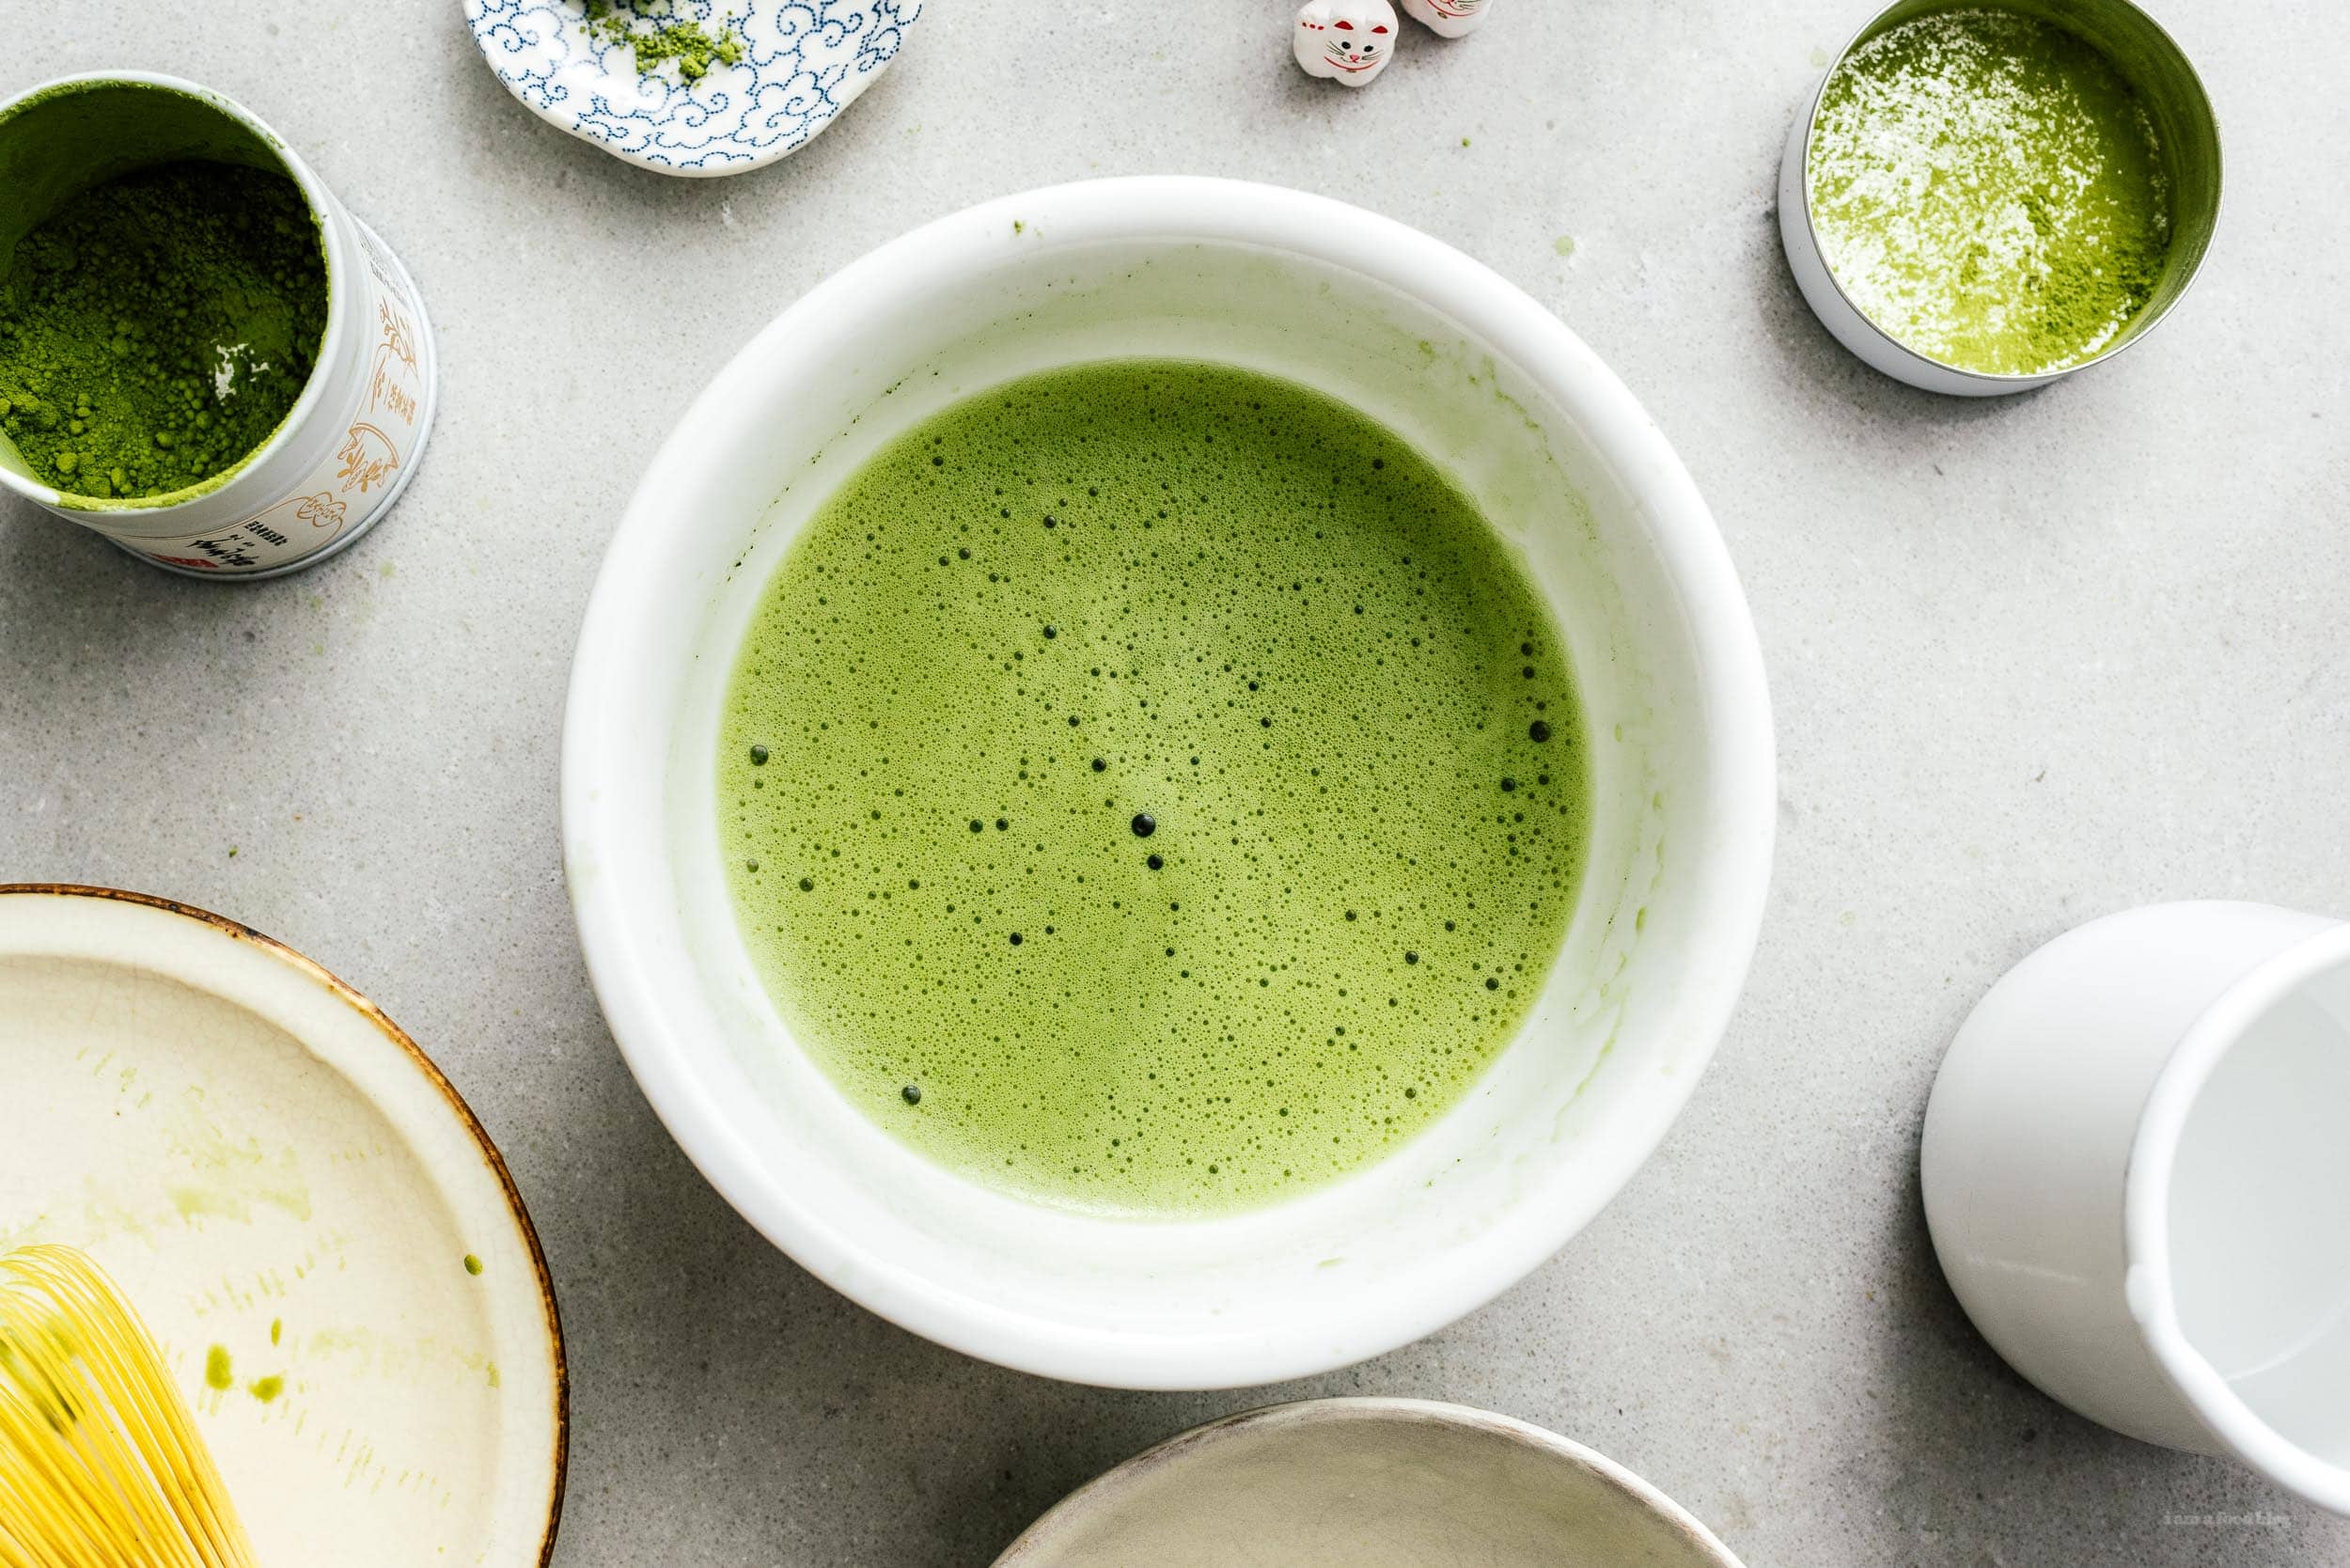
I Am... How to make the best matcha
I have matcha at least once a day. Not in the morning – usually in the afternoon, as a way to take some time to enjoy the little moments in life. It’s energizing, packed full of antioxidants, and is so incredibly delicious. It brings me back to when we lived in Japan and I would try to slow down and savor the seasons even though we were in ever-so-bustling Tokyo.
Matcha green tea
Matcha is taking over the world – from matcha lattes to cake, bread, ice cream, croissants, popcorn, cookies – there seems to be no end to the world’s love of matcha flavored things. It’s no surprise that matcha is the number one favorite flavor of sweets in Japan. From the traditional tea ceremony to more casual lattes in hip cafes, matcha is integral to Japanese culture. Matcha green tea is the purest expression of this. I miss the matcha culture in Japan so much. I never realized how much matcha green tea I drank until we left! From the twist cap cold matcha from convenience stores to the cute matcha cafes, I had so much matcha that I’m surprised that I didn’t turn green.What is matcha?
Matcha is a powdered green tea made from dried green tea leaves. The powdered tea is made from leaves that have been shade grown and doesn’t contain any stems or veins. Matcha is an incredibly vibrant green color, due to extra high chlorophyll levels.What does matcha taste like?
Matcha has a sweet vegetal grassy note, with a hint of nuttiness, and gentle bitter undertones. It’s like next-level green tea!Is matcha good for you?
Incredibly so! Green tea is an antioxidant, but matcha is on another level, benefits-wise, since you consuming the entire tea leaf. The antioxidants in matcha help reduce the risk of heart disease, boost metabolism, and lower blood pressure.Does matcha have caffeine?
Matcha contains more caffeine than regular green tea and just about the same as coffee. Unlike coffee, it doesn’t give you a jittery buzz because matcha has a specific amino acid (L-Theanine) that slows the release of caffeine and provides a sense of relaxing calmness.Which brand should I buy?
If you’re looking to drink your matcha with just water, go for ceremonial grade – we like Ippodo brand from Japan. If you want to enjoy your matcha with milk or sweetener and use it in desserts, culinary matcha is cheaper and will do the trick. Ito En culinary matcha is a good choice - I love their bottled cold green tea, so it makes sense that their culinary matcha is good too.Culinary vs ceremonial matcha powder
Not all matcha is created equally and it can be quite confusing. Generally, the more expensive the matcha, the higher the quality. The main difference is the youth of the green tea plants: the youngest plants produce a more sweeter, intense, rich and mellow flavor which is used for ceremonial matcha. Older plants are used to make culinary matcha.- Ceremonial matcha, because of its pure, sweet flavor is used in traditional Japanese tea ceremonies where they make koicha - a type of thick matcha. Because koicha is so intense, only the best matcha can be used because it’s only ever mixed with water and never used for lattes or in desserts or food. Essentially, ceremonial matcha has nothing to hide behind. Still, even within ceremonial matcha, there are various grades available.
- Culinary matcha is usually what is used for cakes, cookies, and other sweets or foods. Culinary matcha are usually harvested from older plants in the fall. Again, there are various grades of culinary matcha and because there’s no standard of grading, culinary matcha can range from very good to not so good at all.
Do I need a chasen/matcha whisk?
You don’t need a matcha whisk and holder, but if you have one, making match will be infinitely more enjoyable and easier. Traditional matcha whisks, called chasen, are made of a single piece of bamboo and have a multitude of springy whisps specifically designed to help whisk matcha into a creamy emulsified suspension. Chasen’s advantages are twofold: because chasen are made from bamboo, they won’t scratch your bowls and because they have so many prongs, they will actually froth your matcha, unlike a metal whisk. If you get a matcha whisk, it’s best to get the holder – kusenaoshi - as well. The holder holds the whisk with the prongs facing down so they can air dry in the proper shape and not get moldy. If you don’t want to get a chasen (they work great for making whipped cream as well) the next best thing is probably a milk frother. If you have nothing else, you can try shaking it in a sealed bottle.How to make matcha green tea at home
- Warm the bowl. Pour some hot water into your matcha bowl and soften the whisk by whisking it around the hot water. Pour the water out and dry with a clean cloth.
- Sift. Place your strainer over the bowl and put in 1-2 scoops of matcha and sift it into the bowl.
- Pour. Add about 3 tablespoons of water (the ideal temperature is 175°F). Use the whisk to slowly stir until there are no lumps.
- Whisk. Add more water, about 1/3 full. Whisk in from side to side in a zig-zag until the matcha is frothy.
- Enjoy. Drink the matcha straight from the bowl.
Matcha latte
If you want to make a matcha latte, do the same as above but add a tiny bit of sweetener and pour in 3/4 cups of warmed milk of your choice.Tips and tricks
- Don’t buy too much at once. Matcha has a short shelf life, once you open it, it will lose color and flavor so buy in small quantities. Keep it in the fridge for maximum freshness.
- Use a mesh strainer. A mesh strainer will help you sift out any lumps and make the whisking process smoother.
- Think about getting a matcha whisk. If you’re planning on making matcha a habit, get a chasen, or bamboo matcha whisk. It will break up any clumps, whip your matcha uniformly, and produce the right amount of foam.
- Try it out of a bowl. Matcha is best enjoyed out of the ceramic bowl you whisk it in. You cup it with both your hands and breathe in the aromas before sipping. Matcha bowls are about 4.5 to 5 inches in diameter.
- Sweeteners are okay! Feel free to sweeten your matcha with sugar, honey, maple syrup. Just don’t use too much or you’ll overwhelm the delicate matcha flavors.
What else can I make with matcha powder?
- Whipped Matcha (Dalgona Matcha)
- Mint Matcha Pomegranate Pavlova
- Sadaharu Aoki's Matcha Azuki
- Matcha Portuguese Egg Tarts
- Mini Pistachio Matcha Raspberry Puff Pastry Mille Feuille Jars
- Matcha Coconut Macaroons
How to Make Matcha
Japan's most delicious drink as rated by the Japanese.
- 1/2 tsp matcha
- 3 oz hot water (175ºF, about 1/3 cup)
Sift the matcha into a small bowl.
Pour in 1 ounce (2 tablespoons) of hot water into the bowl. Use a matcha whisk to mix gently into a smooth paste.
Pour in the remaining hot water and whisk vigorously in a zig zag motion until frothy.
To make a latte: whisk in 1 cup of steamed milk and sweetener, as desired.

I Am... Cucumber Salad with Avocado
Smashed cucumber avocado salad is the perfect summer treat. Is it hot where you are? We’ve been living through a heat wave and even thinking about turning on the stove makes me hot. Of course it doesn’t stop me from doing crazy things like making cheesy potato balls, but I still prefer cooling, no-cook dishes when I can. And when it gets super hot, I turn to my favorite cooling dish of all time: this cucumber avocado salad. I LOVE cucumbers. They’re crunchy, almost sweet, juicy, and so refreshing. Especially when they’re fridge-cold and coated in an addictive sesame-soy dressing. Cucumbers are the ideal hot-weather food and this cucumber avocado salad is the epitome of the whole cool-as-a-cucumber saying. Cucumber salad is one of the most popular cold dishes in China and really, it’s no surprise because it’s great on its own or at the table alongside pretty much any Chinese dish. Essentially this is your classic smashed cucumber salad but with a little twist: avocados. I love adding avocados for a creamy buttery foil to the crisp cucumbers. Everything gets dressed up in a toasted sesame-soy sauce-black vinegar dressing that is savory, sweet, and addictive.
Why make a cucumber salad?
This is the perfect quick and easy salad to throw together when you’re hungry but you don’t want to cook anything. The crisp cucumbers are crunchy and refreshing and the avocados add heft and creaminess. You might not think of salads as satisfying, but this one definitely is.Ingredients for the perfect cucumber avocado salad
Cucumbers
The best cucumbers to use for this salad are either long English or Persian. Both of these cucumbers are thin-skinned which means you don’t have to peel them. They also happen to be nearly seedless and crispy instead of watery. English cucumbers are bit bigger, both in diameter and length. I actually prefer Persian cucumbers because they’re mini, but both are perfect for this salad. Stay away from regular waxy, thick-skinned cucumbers. Usually cucumbers are smashed for Chinese cucumber salad – I typically smash all cucumbers for salads but in this case, I just sliced them for aesthetic reasons. The reason for smashing are the coarse, random craggily edges smashing gives. The extra nooks and crannies soak up sauce and flavor the cucumbers to the core. To smash, just use the side of a cleaver or a rolling pin.Avocados
Avocados are annoying. There, I’ve said it. They’re finicky, can be expensive, and every single one is a surprise. But, they’re also worth it. There’s a reason why avocados are so popular. I always buy avocados unripe and ripen them at home to ensure better success when cutting into them. More on how to choose perfect avocados later in this post.Soy sauce
There are so, so many soy sauces out there. I could write a whole blog post on soy sauce! Most good Asian grocery stores devote a whole aisle to the hundreds of different types. Obviously the best one is the one in your pantry, but if you’re running out or want to expand your soy sauce collection, make sure you go for naturally brewed. There are two main types of soy sauces commercially available: naturally brewed/fermented and chemically produced. Get the naturally brewed or fermented for its complex deep aroma and flavor. We like both Amoy and Lee Kum Kee. In this case, you’re looking for light soy sauce. Even better if you get first extract/first press soy sauce.Chinese black vinegar
Black vinegar, also known as Zhenjiang or Chinkiang vinegar is a rice based vinegar that is fruity, slightly sweet, malty, and just the bit reminiscent of balsamic. It adds acidity and sweetness and is a backbone in Chinese cooking. It’s used in cold appetizers (like this one!), braised proteins, and as a dipping sauce for dumplings. You can use it just as you would regular vinegar and it’ll add just a touch more complexity. It’s sold in the Asian aisle at most grocery stores, in your local Asian grocery store, or online. If you don’t have any, you can sub rice vinegar or regular white vinegar, but it won’t be quite the same.Toasted sesame oil
Toasted sesame oil will add an incredible amount of aroma to this dish. It’s intensely nutty, toasty, and so so good. It’s not the same as regular sesame oil (which is typically used for cooking). Toasted sesame oil is made from toasted sesame seeds and is a finishing oil, much like a really good olive oil. Our favorite brand is the Japanese one, Kadoya, with its signature bottle shape and yellow cap. You can find it in the Asian aisle at most grocery stores, in your local Asian grocery store, or online.Aromatics
Garlic, red onion, and cilantro add some extra oomph to this salad. The earthiness of the garlic and the tart sharpness of the red onion pair well with the neutral juiciness of cucumbers. For garlic, we like to buy loose, locally grown garlic, but obviously those garlic bulbs in the little mesh bags will work too, but they don’t taste nearly as good. Choose a red onion that is firm and heavy for its size. Cilantro is one of those herbs that adds an amazing amount of freshness, so pile it on - assuming your one of those people who loves it.How to pick the perfect avocado
Ahh, the eternal question: will you win the avocado lottery!? There are so many factors. Will your avocado be perfectly ripe? Is it free of blemishes and bruises? Will the pit be a reasonable size or will it be bigger than you thought possible?- Buy unripe: While there’s no way to guarantee a perfect avocado, I do have tips for you. I prefer to buy my avocados green and hard and let them ripen at home. Yes, you have to do a little bit of planning, but if you buy your avocados unripe it means that they won’t have any nasty bruises from people over-enthusiastically squeezing for ripeness at the grocery store.
- Let ripen on the countertop: After a couple of days of resting time out on the counter, your avocados will most likely be ripe but not mushy, perfectly jade green without any hints of brown bruising. When you hold your avocado in your palm, it will feel heavy. Gently squeeze your palm without squeezing your fingertips. There should be a bit of give where the avocado yields to firm gentle pressure. It will feel slightly soft but not at all mushy. This is the prime time to use them! If you’re not ready to eat them store them in the fridge for a day or two.
- Check ripeness: Another way to check is flicking off their little dry stem nubbin (also called their naval or belly button!) and take a look at what color it is underneath. If it’s bright green, I know it’s good to go. If the stem doesn’t want to budge, it means that it needs a bit more time. And if it’s gross and brown underneath, it’s basically time to cry, cut off the brown bits and make some sad not-quite-right guacamole.
How to safely cut and peel an avocado
Avocado hand – that’s where you slice through your hand - is real. Don’t cut avocados in your hand, I beg of you! I could tell you the horror story about how I “filleted” my palm, in the words of the urgent care doctor that glued me back together, but I think we’re all adults here and just want to cut avocados the safe way. The safest way to cut an avocado is to place the avocado on a cutting board and cut lengthwise, in the middle carefully, rotating around the seed, keeping your fingers out of the way. Twist half of the avocado off and remove. Place the remaining half (with the pit) on a dish towel and VERY carefully tap your knife into the pit so that it wedges itself in. Twist the knife and remove the pit. This is slightly more dangerous than the method below. Alternatively, if you’re not comfortable removing the pit from half an avocado, simply make another cut, lengthwise around the halved avocado so you have two quarters, making the pit easy to pluck out with your fingers. This is the safest way to remove the pit. After the pit is removed, the neatest way to get your avocado out of the skin is to place the avocado, cut side down on to your cutting board and peel off the skin. Of course if you’re not concerned about aesthetics you can just use a spoon to scoop it out. Happy salad-days of summer! I hope you guys pop this cucumber avocado salad into your summer rotation. It really is the best. PS - If you’re looking for something to serve alongside with, try out this easy zha jiang mian/saucy pork noodles, spicy shrimp and snap pea stir fry, or yang chow fried rice!Chinese Cucumber Avocado Salad
- 1 clove garlic (minced)
- 2 tsp black Chinese vinegar (or rice vinegar)
- 2 tsp soy sauce
- 1 tsp toasted sesame oil
- 1 tsp chili oil (optional)
- 1 avocado (sliced)
- 1/2 English cucumber (sliced)
- 2 tbsp red onion (thinly sliced or finely diced)
- fresh cilantro (chopped)
- toasted sesame seeds
In a small bowl, whisk together the garlic, vinegar, soy sauce, sesame oil, and chili oil (if using). Taste and season with a pinch of salt if needed.
Prep the vegetables: Pit, peel, and slice the avocado; cut the cucumber; slice the red onion; and chop the cilantro.
Toss the cucumbers, avocado, red onion, and cilantro in a bowl with the dressing. Finish with toasted sesame seeds, if desired and enjoy!

I Am... Chinese Chicken Salad
If you’re looking for a refreshing, hearty, flavorful chicken salad, this salad is for you. Fresh, crunchy lettuce and cabbage, sweet carrots, juicy oranges, chicken, herbs, and crunchy almonds are all tossed with a zingy, umami ginger-garlic sesame vinaigrette. No sad salads here! And the best part is that this is a salad that you can make ahead or meal prep, giving you salad days in a flash. Now that it’s summer, I’m living on salads all day, every day. I have my very own Mandy’s/Sweetgreen going on at home with different containers (glass, of course) of various prepped leaves, vegetables, and toppings. At least once a week I ask Mike if he wants to “order” a salad from me, but every single time the answer has been no, which is very sad for me because how am I going to live out my salad bar dreams?!
I love salad
At least I have a very healthy love for salad, so I can make daily salads for myself. I’m not sure why, but I like having everything separate and then making salads a la minute instead of having them ready to eat in a container. But then again, sometimes on the rare occasion that I don’t finish my salad and I pop it in a container in the fridge for the next day, it somehow tastes better? In my opinion, both are good: fresh-made salads and meal prep. Someone should start a salad company where they sell both types. This salad happens to be one that tastes amazing both ways. Even when you meal prep it and the wonton strips get a little soggy, it adds a little bit of extra flavorful texture. Of course, if you’re an expert salad meal prep person, you have those little containers on the side for your dressing and crunchy toppings so you don’t have to have soggy wonton strips.What is Chinese chicken salad?
Anyway, back to this salad, which we’re calling Chinese chicken salad even though I’m Chinese and I have no idea why everyone on the internet calls it that. I’m rolling with it, though. Chinese chicken salad is essentially a leafy green salad with chicken and a ginger-sesame dressing. Typically there are crunchy things too, like deep-fried noodles, deep-fried wonton strips, sliced almonds, and toasted sesame seeds. There are usually lots of herbs and sometimes mandarin oranges. It’s a refreshing, hearty salad, and it’s really, really good! It kind of is slightly reminiscent of a Chinese dish of shredded chicken, but also, not really. Really, I’m pretty sure it’s called Chinese chicken salad because it’s been popularized that way by chain restaurants like Cheesecake Factory and P.F. Chang’s. Questionable origins aside, this salad is a keeper and in my regular salad rotation.How to make Chinese chicken salad
Like all salads, this one takes some prep. If you’re not a person who finds washing and cutting vegetables a zen activity, by all means, buy those bagged prepped cabbage mixes or shredded carrots. If you think cutting vegetables is fun (I do because I’m a monster), then for this salad you need to:- Prep the vegetables: wash, dry, and shred the lettuce; wash, dry, and shred the cabbage; peel, wash, dry, and julienne the carrots; wash, dry, and slice the green onions; wash, dry, and chop the cilantro; and drain (or peel) the mandarin oranges.
- Shred the chicken: This salad is begging for leftover chicken. Shred up any extra chicken you might have, or if you need to meal prep some chicken breasts, use your go-to recipe or give air frying a try.
- Make the crunchy bits: You can opt to buy crunchy noodles at the store, or you can make them at home. If you’re making them at home, you can either use wonton wrappers that you slice up or egg noodles. For both, heat up about an inch of neutral oil in a small pot over medium-high heat. When the oil is hot and shimmery, add a small amount of the wonton wrappers or egg noodles and fry until golden and crispy. They’ll crisp up quite quickly. Move and flip them as needed, and after a minute or two, remove them from the oil, drain and cool.
- Make the dressing: In a bowl, whisk together soy sauce, rice vinegar, toasted sesame oil, a bit of neutral oil, a touch of sugar, minced ginger, and garlic. Taste and adjust if needed.
- Assemble: Add the shredded greens, carrot, herbs, and chicken (and oranges if using) to a bowl. Add the dressing and toss well.
- Enjoy: Finish the salad by topping it with the crunchy bits and enjoy!
Chinese chicken salad ingredients
Greens - shredded lettuce, cabbage, and carrots are the bulk of this salad. Personally, I love a mix of green and red cabbage and shredded romaine. I’ve also fallen in love with raw savoy cabbage recently—it’s a bit more tender and sweet and so, so good. So many cabbages, so little time. Herbs - a mix of thinly sliced green onions and chopped cilantro add a bit of fresh herbaceousness. oranges - this is something I’ll put in if we have it at home, but not something I’d go out and buy. But, when you have them, it does add some sweet juiciness that makes this salad elite. chicken - any kind of shredded chicken works for this salad. Leftovers or freshly cooked, it’s all good. For me, I like salads that have protein in them, so when I can, I almost always double the amount of protein called for in a salad. Luckily we eat a lot of chicken, so we almost always have some on hand. crunchy bits - arguably the best part of any salad, the crunchy bits are what keep it interesting. I definitely think thinly sliced almonds are a must. I like the thinly sliced ones with skin on, for some reason, they’re much more delicate and crunchy. For the other crunchy parts, I like to go with either homemade deep-fried wonton strips or homemade deep-fried egg noodles. They’re both super quick and easy to make at home. Or, you can buy them - they’re either with the salad toppers or in the Asian aisle in a bag - they’re packaged to look like chips. dressing - the dressing for this salad is pretty straightforward; the only thing that is a little bit annoying is finely mincing the garlic and ginger. Normally I’m a huge fan of using granulated garlic and ginger, but for this dressing, fresh is what you need. To your freshly minced garlic and ginger, we’re going to add soy sauce, rice vinegar, toasted sesame oil, a touch of sugar, and a bit of neutral oil.Chinese chicken salad dressing
This dressing is zingy and full of flavor. It’s super simple to make and takes all the ingredients in this salad and makes them sing. Typically, Chinese chicken salad dressing is an oil vinaigrette with sesame, ginger, and ginger overtones. It’s incredibly addictive and will cause you to eat so much salad, in a good way.The best kind of chicken for salad
Leftover chicken is the best! I know a lot of people who actually buy a rotisserie chicken and shred that up, but usually we just get bone-in, skin-on thighs. I’ll skin and debone them (and save all that to make Hainanese chicken) and simply boil and then shred them. Chicken thighs are truly the most flavorful part of a chicken, but any kind of cooked, shredded chicken will do. For this particular salad, I did chicken breast poached in a gingery, garlicky stock, and they turned out super juicy.What are the crunchy things in Chinese chicken salad?
The crunchy bits vary, but they’re typically deep-fried wonton strips, slivered almonds, or crunchy chow mein noodles. For us, we prefer a combination of crunchy wonton strips and almonds. It’s super easy to make them at home yourself, and you don’t even need a lot of oil. If you don’t want to add an extra step, you can grab a bag of fried noodles at the grocery store in the Asian aisle. They look like short little golden fried noodles in a bag, kind of like chips, but noodles.How to meal prep Chinese chicken salad for the week
This salad is great for meal prep because you can do all the prep on Sunday, pack everything up, and have salad throughout the week. The key is to pack it up like they pack up salad kits in the grocery store. All the green things go together, the dressing goes in a little cup, and the crunchy bits are in a container, ready to go on at the end. It helps if you have the right containers. I love these guys for dressing and the crunchy bits and as for the vegetables, you can use any container you have on hand. It’s best if you put the chicken in a separate container too so it doesn’t wilt the vegetables too much, but it’s not absolutely necessary.What to serve with Chinese chicken salad
I think this salad is a meal in itself, but if you’re looking to have a salad party, try some of these as well:- super refreshing, crunchy cucumber salad
- a hearty, also chicken salad, but Caesar style with romaine and kale
- the most refreshing combination of watermelon, feta, and cucumber
- broccoli salad is a sleeper hit, it’s hearty, crunchy, and filling
- a super savory cabbage and chicken salad dressed with the most umami dressing you’ll ever have
Chinese Chicken Salad
The best Chinese chicken salad: fresh, crunchy lettuce and cabbage, sweet carrots, juicy oranges, chicken, herbs, and crunchy almonds.
Dressing
- 2 tbsp soy sauce
- 3 tbsp rice vinegar
- 1 tbsp toasted sesame oil
- 1 tbsp neutral oil
- 1 tsp sugar
- 1 clove garlic (minced)
- 1 tsp fresh ginger (minced)
Salad
- 4 cup lettuce (of choice, shredded)
- 1 1/2 cup cabbage (shredded)
- 1 medium carrot (julienned)
- 1/4 cup green onions (sliced)
- 1/4 cup cilantro (chopped)
- 1 cup mandarin oranges (canned, optional)
- 2 cup cooked shredded chicken
- 1/2 cup crunchy deep-fried wonton strips
- 2 tbsp sliced almonds
In a small bowl, whisk together all the dressing ingredients.
Toss the lettuce, cabbage, carrots, green onions, cilantro, and oranges (if using) in a large bowl. Add the chicken and dress the salad to taste.
Top with crunchy wonton strips and sliced almonds and enjoy!
I Am... How to Make the Crunchiest Asian Fried Chicken in an Air Fryer
Every culture has fried chicken, and Asian fried chicken is some of the most celebrated around. From the ubiquitous orange chicken, sesame chicken, or honey garlic chicken, to favorites like chicken karaage or taiwanese popcorn chicken, it’s clear that the world loves all the Asian fried chickens. And, believe it or not, along with being quick and easy, the air fryer is one of the best ways period to make any Asian fried chicken recipe.
How is Asian fried chicken different?
Asians love texture to a fault; it’s just a fact. I have a running joke that if I ask Steph how good a Chinese restaurant is, she will only describe their textures, like “they make really crispy fried chicken” or “they have really chewy noodles”. It’s taken for granted that the food tastes good. So likewise with the wings, Asian fried chicken emphasizes texture. Sometimes this means crisp shattering crunch, but sometimes it also means “used to be crunchy but now saucy”. You have to taste it to understand that one.How to make the best fried chicken
Almost all Asian fried chickens are made the same way:- First you marinate the chicken (if it’s not being coated in a sauce).
- Then it’s dredged in a flour or starch coating, then fried
- Then sauced while hot or dusted with spices, if needed.
The best coating to use for fried chicken: potato starch vs cornstarch vs flour
Most of the time, we use potato starch or cornstarch. Potato starch can be hard to find (although Amazon is now a thing, and Bob’s Red Mill is carried everywhere) but produces the best, lightest, crispiest results. Cornstarch comes in a close second and you can get it everywhere. Sometimes, we will use rice flour or cake flour. Unless you really have nothing else, try to avoid all purpose or bread flour. The lower the gluten, the lighter and crispier the wings.How to make Asian fried chicken in an air fryer
The air fryer is perfect for making light, crispy wings. The fan movement of the air allows an even cooking, while the lack of extraneous oil means you get a lighter final product. Here’s how you do it:- Season and marinate the chicken (optional). Salt and pepper your chicken and let stand for 5 minutes or so. If you are making a chicken that requires a marinade, do it now as well.
- Pat the chicken dry with paper towels. Water generates steam, and steam is our enemy right now.
- Lightly oil the chicken. This is to help promote even browning. You can/should use a spray oil for this, but you can also just toss the chicken in 1 tablespoon of a high heat oil as well.
- Toss the chicken in potato/corn starch. I like to use a ziplock bag or, even better, a compostable produce bag.
- Air fry the chicken. Oil the basket of your air fryer with the spray bottle or a brush. Then arrange the chicken on a single layer with at least 1/4” spacing between each piece.
- Flip the chicken. I don’t like the shaking method, I’ve found that it’s better to just use tongs to flip the chicken so that the other side is consistently even. Besides, you need the tongs to take the chicken out later anyway.
- Sauce or salt? Remove the chicken immediately so that a) it doesn’t overcook and b) the sauce or spice dusting will stick to it better.
What can you make with this recipe?
- Vietnamese Fried Chicken: After frying, dust with our Vietnamese chicken spice (equal parts sugar, white pepper, onion powder, and garlic powder).
- Taiwanese Popcorn Chicken: Toss with 1 teaspoon soy sauce, then marinate with 1 teaspoon white pepper and 1 teaspoon five spice. After frying, dust with another 1 teaspoon white pepper and 1 teaspoon five spice.
- Korean Fried Chicken: After frying, coat with korean spicy chicken sauce (1 tablespoon each ketchup, gochujang, honey, brown sugar, and garlic, and half tablespoon each of soy sauce, toasted sesame oil, and minced ginger).
- Japanese Karaage Wings: Marinate with 1 tablespoon each of soy sauce, sake, minced ginger, and crushed garlic, as well as 1 teaspoon sugar.
- Thai/Vietnamese Fish Sauce Wings: After frying, coat with our fish sauce vinaigrette (1 tablespoon sugar, 1 tablespoon fish sauce, 1 tablespoon lime juice, 2 cloves garlic, 1 Thai chili).
- Orange Chicken: After frying, coat with our 5 ingredient orange chicken sauce (1/4 cup each of orange juice, soy sauce, sugar, and rice vinegar, plus a tablespoon of cornstarch to thicken).
Tips for the best fried chicken
- Always season your chicken
- Dry your chicken as well as possible, steam is the enemy of crunch
- For ultimate crispiness, you can double fry the chicken by letting the chicken rest for 5 minutes after frying both sides, then putting it back in for another 5 minutes.
The Best Air Fryer Asian Fried Chicken Wings
- 1 lb chicken wings
- 1 tbsp oil
- 3 tbsp cornstarch
- salt and pepper
Coat the chicken with the oil, then season with salt and pepper. Toss with corn starch.
Spray the air fryer basket with oil or use a brush/paper towel to apply a thin coat of oil onto it. Arrange the chicken in a single layer and air fry the chicken at 400ºF for 15 minutes. When the 15 minutes is up, flip the chicken and air fry another 5 minutes.
Remove chicken immediately. Sauce or dust as needed.

I Am... Cinnamon Rolls
Super soft and ooey gooey homemade cinnamon rolls are my love language. I mean, all food is my love language but cinnamon rolls are just the ultimate in comfort. Sometimes I wish I could just roll myself up in a soft and gooey cinnamon roll blanket and eat it whenever. But really, that would be kind of weird. So maybe I just want to wrap myself in a blanket that looks like a cinnamon roll while I eat warm soft cinnamon rolls right out of the oven!
How to make cinnamon rolls
- Activate the yeast. Sprinkle the yeast on to warm milk and let foam.
- Add sugar, eggs, and melted butter and mix throughly.
- Stir in the flour until everything comes together into a ball of dough.
- Knead the dough until smooth, then pop into a lightly oiled bowl so it can proof for an hour.
- After the dough is puffy and proofed, tip it out onto a floured surface and roll it into a rectangle.
- Spread out some soft butter and sprinkle on brown sugar and cinnamon.
- Roll it up tightly, cut into even pieces, and place in a pan and let proof until doubled.
- Bake until gooey and golden.
- Top it off with cream cheese glaze and enjoy!
Homemade cinnamon roll ingredients
- Yeast - this recipe uses active dry yeast which needs to be dissolved in a bit of liquid before using - in this case we’ll sprinkle it on to milk. If you have instant yeast, you can use it too, there won’t be much of a difference; your rolls might rise a bit faster, depending how warm your kitchen is.
- Milk - I use 2% milk but any milk will work here, even almond or oat milk. Warm the milk up slightly in the microwave (I usually pop it in the microwave in 20 second increments) You want it between 105-115°F, which feels like a warm bath.
- Eggs - not all cinnamon bun recipes have eggs in them, but this one does and it adds extra richness and flavor because the cinnamon roll dough is enriched instead of just regular. Make sure you take your eggs out of the fridge and let the come to room temp. If you forget, just pop them into a bowl with hot tap water, which will bring them to room temp faster.
- Bread flour - this one is important. You might be tempted to just use all purpose, and well, you can do that, but if you use bread flour your rolls will be soft and fluffy with just the right amount of chew. Bread flour has a higher protein content than regular all purpose – the resulting dough has more gluten in it which helps the rolls stay soft and chewy.
- Cinnamon - obviously cinnamon rolls need cinnamon. But the kind of cinnamon you use is important too. Cinnabon’s cinnamon (if you’re looking to create a copycat cinnabon) is a special super cinnamon-y proprietary blend called Makara - they sell it! If you don’t want to get cinnabon cinnamon, go for Ceylon cinnamon if you can.
Why are cinnamon rolls so good?
These particular cinnamon rolls are super soft, fluffy, and perfectly chewy, with so much gooey brown sugar cinnamon and luxurious melty cream cheese icing. The sweet, sweet smell of brown sugar and cinnamon and butter while you’re baking is absolutely irresistible. These are my DREAM rolls. If you love sweet, bread-y things, these cinnamon rolls are for you.Cinnamon roll icing
Is cinnamon roll icing the best part of a cinnamon roll? I think the little medium rare nugget in the middle is the best, but gooey, drippy cream cheese icing comes close. Make sure you ice your rolls when they’re still warm so the icing nestles itself into all the noodles and crannies.To make cinnamon roll icing
Simply mix together room temp cream cheese, soft butter, and powdered sugar. The key is to use room temp cream cheese so you don’t get any cream cheese lumps. You can also add a touch of vanilla.Overnight cinnamon rolls
To make overnight cinnamon rolls, after shaping and cutting the rolls, pop them in the pan and wrap well with plastic wrap. Let the rolls rise overnight in the fridge. The next day, 1 hour before you’re going to bake, let them rest on the counter top, then bake as directed.How to freeze cinnamon rolls
You can freeze these 2 ways, before baking and after baking:Before baking
After cutting the rolls, place them in the pan, then immediately cover with plastic wrap and freeze - don’t let them proof. The night before you’re going to bake, let the rolls rise overnight in the fridge. The next day, 1 hour before you’re going to bake, let them rest on the counter top, then bake as directed.After baking
Let the rolls cool completely and leave them unfrosted. Wrap up the entire tray or separate them out individually. Defrost at room temp then warm in a 350°F oven until warmed through, about 10 minutes, or microwave for 20-30 seconds.How to store cinnamon rolls
Keep them in an air tight container on the counter top for up to 3 days. After that, store them in the fridge for up to a week and make sure you reheat before enjoying!How to reheat cinnamon rolls
Heat in the microwave for 20-25 seconds or in a low oven for 5 minutes or until warmed through.Cinnamon rolls or cinnamon buns?
Do you think there’s a difference between cinnamon rolls and cinnamon buns? Personally I use the terms interchangeably. They’re both soft and squishy and delicious. But, did you know that the youths refer to people as “cinnamon rolls”? When someone calls you a cinnamon roll, it means you’re soft and cute. It’s a good thing!Other Cinnamon Roll Variations
- Small Batch Copycat Cinnamon Streusel Starbucks Coffee Cake Recipe
- Cinnamon Roll Mugs: The Best Ever Overnight Cinnamon Rolls Recipe
- Easy 6 Ingredient Vegan Cinnamon Rolls Recipe
- Coconut Cinnamon Buns
- Sunday Brunch: 1 Hour Mini Cinnamon Buns with Whisky Cream Cheese Frosting
- The Best No-Knead Cinnamon Roll Recipe
- Tiktok Cinnamon Rolls
And other things to bake with cinnamon!
- Small Batch Copycat Cinnamon Streusel Starbucks Coffee Cake Recipe
- Caramelized Cinnamon Toast Recipe
- Best Ever Cinnamon Toast Recipe
- The Best Snickerdoodles
Cinnamon Roll Recipe
Super soft, fluffy, and perfectly chewy cinnamon rolls with so much gooey brown sugar cinnamon and luxurious melty cream cheese icing.
- 3/4 cup warm milk (110°F)
- 2.25 tsp active dry yeast (1 envelope)
- 1/4 cup sugar
- 1 egg (plus 1 extra egg yolk, room temp)
- 1/4 cup unsalted butter (melted and cooled)
- 3 cups bread flour (or 360g all purpose flour + 3.57g vital wheat gluten)
- 3/4 tsp salt
- 1/4 cup unsalted butter (room temp)
- 2/3 cup dark brown sugar (lightly packed)
- 1.5 tbsp ground cinnamon
- 4 oz cream cheese (room temp)
- 3 tbsp unsalted butter (room temp)
- 3/4 cup powdered sugar
- 1/2 tsp vanilla extract (optional)
In the bowl of an electric mixer, add the milk and sprinkle on the yeast. Let sit until the yeast starts to foam, 1-2 minutes. Stir in the sugar, egg, egg yolk, and melted butter then stir in the flour and salt with a wooden spoon until everything comes together into a ball of dough.
Knead with the dough hook on medium for 8 minutes. Alternately, knead by hand for 8-10 minutes on a floured surface. Lightly oil and large bowl and place the dough inside.
Cover with plastic wrap and a kitchen towel and let rise for 1 to 1 and a half hours or until doubled in size.
On a lightly floured surface, tip out the dough and roll out to a large, long rectangle, about 14 x 20 inches. Spread the butter evenly, all the way to the edges. Whisk together the cinnamon and sugar in small bowl then spread evenly onto the dough.
Roll into a tight roll, and cut into 9 even pieces for an 8 x 8 or 9 x 9 inch pan. If using a 11 x 7 inch pan, cut into 6 pieces for giant rolls or 12 for smaller rolls. Place the rolls into the pan.
Cover loosely with plastic and let rise in the fridge overnight. Or, if you’re wanting to bake right away, cover and let rise at room temperature for 30 minutes to 1 hour, or until doubled.
When ready to bake, remove the rolls from the fridge and heat the oven to to let come to room temperature as the oven is heating up, about 30-45 minutes. Heat the oven to 350°F. Bake for 25-30 minutes, or until slightly golden and just cooked through or the internal temp comes to 190°F.
While the rolls are baking, make the frosting by beating together the cream cheese, butter, powdered sugar, and vanilla (if using) until light and fluffy. Let the rolls cool for 5 minutes, then frost. Enjoy!
Inspired by Ambitious Kitchen

I Am... Big Mac Tacos (Smash Burger Tacos)
Big Mac tacos, smash tacos, big mac smash tacos, smash big mac tacos, Tiktok big mac tacos, smash burger tacos – no matter what you call them, they are delicious! If you love tacos, Big Macs, and smash burgers, this mash up smash taco recipe is going to bring a smile to your face and a hum in your tum. Crispy and soft flour tortillas, a juicy smashed burger patty, bright and zesty big mac sauce, briny pickles, and fresh crunchy lettuce all combine together into a perfect handheld bite. If you’re on foodtok you’ve definitely seen Big Mac Tacos. Maybe you’ve even made them but want to make them even tastier. We’re here to help! The marriage of Big Mac and taco is not something to just smash together. We’ve got all the tips and tricks for making the best big mac tacos out there.
What is a big mac taco?
It’s essentially all the perfection of a Big Mac in taco form: a juicy beef patty, special sauce, melty American cheese, shredded lettuce, a pickle slice, and diced onions, tucked into a crispy flour tortilla.How to make big mac tacos
- Smash - portion out tiny balls of ground beef and smash/press them onto flour tortillas, so they’re super flat and thin. Lightly season the beef with salt and pepper.
- Grill - heat up a pan over medium-high heat and place the tortilla burger meat side down. The beef will cook through completely while pressed up directly against the hot pan. When the beef forms a golden brown crust and cooks through, lower the heat and flip the tortilla over so the tortilla crisps in the pan.
- Melt - while the tortilla is crisping up, add a slice of American cheese and cover the tacos so the cheese melts.
- Sauce - Mix together all the Big Mac sauce ingredients (mayo, ketchup, sweet relish, mustard, vinegar, onion powder, garlic powder, and paprika).
- Finish - when the cheese is melty and the beef is ready, remove the tacos from the pan and top them with a slice of pickle, Big Mac sauce, shredded lettuce, diced onions, and an optional sprinkle of toasted sesame seeds.
- Enjoy - fold them up, devour, and enjoy!
Big mac taco ingredients
- flour tortillas - mini flour tortillas are sitting in for buns. Flour tortillas are where it’s at for these tacos, they stay plush and soft, while getting a little bit golden and crispy in the pan.
- ground beef - you’ll want a standard 80/20 ground beef for your tacos so the patties stay juicy and moist.
- Big Mac sauce - it’s not a Big Mac without special sauce. You can make an amazing copycat recipe at home, more on that below.
- toppings - classic toppings for a Big Mac are: melty American cheese, sliced pickles, diced onion, and shredded iceberg lettuce. I added a tiny sprinkle of toasted sesame seeds to give it the sesame seed bun finish, but this is completely optional.
What kind of tortillas for Big Mac tacos?
Definitely use flour tortillas to emulate a bun. If you only have corn tortillas you could use those too, but I really feel that flour tortillas are perfect for Big Mac tacos. Street size flour tortillas, that are about 4.5 inches across are perfect.Who invented big mac smash tacos
I’m not sure who invented them, but I think the first Big Mac smash taco that I saw wasn’t actually on Tiktok! It was on instagram on thenaughtyfork’s page. From there I’ve been seeing them pop up everywhere. If you know who invented them, let me know in the comments.Big mac sauce recipe
Big mac sauce is what makes a Big Mac a Big Mac. That and well, the “two all-beef patties, special sauce, lettuce, cheese, pickles, onions, on a sesame seed bun”. Big Mac sauce is essentially a burger sauce made from regular condiments. If you’re really crazy, I think you can go to McDonald’s and ask them if you can buy some of their sauce. McDonald’s Big Mac sauce ingredients include: sweet relish, sugar, vinegar, onion powder, mustard seed, garlic powder, paprika, and a bunch of preservatives and additives. Surprisingly there are no tomatoes or ketchup in it. For our homemade purposes, we’re going to use ketchup, because ketchup has a lot of the ingredients that is in Big Mac sauce (high fructose corn syrup, vinegar, and onion powder). Big Mac sauce is creamy, sweet, and tangy. You can make an amazing copycat Big Mac sauce at home with pantry ingredients. You’ll need sweet relish, mayo, vinegar, yellow mustard, garlic powder, onion powder, paprika, and yes, in this case, the oh-so-controversial ketchup. Mix everything up, let the flavors meld, and enjoy your at home Big Mac genius.What to serve with big mac tacos
To be honest, these guys are perfect on their own, but you could also serve them up with: And you can also use that delicious homemade big mac sauce anywhere and everywhere! Happy taco-ing! xoxo stephBig Mac Tacos
This mash up recipe is going to bring a smile to your face and a hum in your tum
- 1 lb ground beef (lean or extra lean preferred)
- 12 flour tortillas (street/mini size preferred)
- 1 tbsp neutral oil
- 12 slices American cheese
- 2 cups lettice (shredded, iceberg preferred)
- 12 slices pickles
- 1/4 onion (chopped)
- toasted sesame seeds (optional)
Big Mac Sauce
- 1/4 cup mayo
- 2 tbsp ketchup
- 1 tbsp sweet relish
- 1 tsp yellow mustard
- 1/2 tsp white vinegar
- 1/2 tsp sugar
- 1/4 tsp paprika
- 1/4 tsp garlic powder
- 1/4 tsp onion powder
Mix together the mayo, ketchup, relish, mustard, vinegar, sugar, paprika, garlic powder, and onion powder in a small bowl. Cover and place in the fridge to let the flavors meld. The longer the sauce melds, the tastier, but you can use it right away after the tacos are ready.
Make the smash tacos by dividing the beef into 12 equal portions that are ball shaped. You can eyeball it or use a scale to divide it into 1.3 ounce portions. Lay out a tortilla and place a portion of beef on top.
Use clean or gloved hands to press the meat onto the tortilla, flattening it out to the edges. Alternatively, you can use the bottom of a glass that’s lightly moistened with water or a burger press to press the meat flat. Lightly season with salt and pepper. Repeat with the remaining tortillas.
Heat a large skillet over medium high heat and add a touch of oil, swirling to spread it out. Add as many tacos as you can, without crowding too much, beef side down. Cook without moving for 2-3 minutes or until the beef gets a good golden brown crust. When the patties are ready, flip them over and lower the heat to medium low.
While the beef is cooking, remove the slices of American cheese from the wrappers. Top the cooked patties with a slice of cheese each, then cover with a lid and cook for another 1-2 minutes, or until the cheese melts and the tortillas are gold and crisp. Remove from the pan and keep warm in a low oven or top immediately and enjoy.
To finish the Big Mac tacos, add pickles, Big Mac sauce, shredded lettuce, diced onions, and an optional sprinkle toasted sesame seeds. Enjoy immediately!

Latest Comment
“Sending you love on your journey with chemo!”Beth on Tiktok Hot Honey Cottage Cheese Sweet Potato Beef BowlPopular
 2015 Holiday Giveaway
  One-Pot Lemon Scallop Pea Spaghetti
  Beer Battered Onion Rings, Jalapeno Aioli
  2014 Holiday Gift Guide and a Giveaway
 Easy Gourmet Hot Wings and a Giveaway!
  The Ultimate Veggie Sandwich
  Vegan(!) Creamy Corn Soup Recipe
  Sunday Brunch: Grilled Cheese Eggs Benny
